Expanse 101: Introduction to Running Jobs on the Expanse Supercomputer
Presented by Mary Thomas (SDSC, mpthomas@ucsd.edu )
In this tutorial, you will learn how to compile and run jobs on Expanse, where to run them, and how to run batch jobs. The commands below can be cut & pasted into the terminal window, which is connected to expanse.sdsc.edu. For instructions on how to do this, see the tutorial on how to use a terminal application and SSH go connect to an SDSC HPC system: https://github.com/sdsc-hpc-training-org/basic_skills.
Misc Notes/Updates:
- You must have a expanse account in order to access the system.
- To obtain a trial account: http://www.sdsc.edu/support/user_guides/expanse.html#trial_accounts
- You must be familiar with running basic Unix commands: see the following tutorials at:
- https://github.com/sdsc-hpc-training/basic_skills
- The
hostnamefor Expanse isexpanse.sdsc.edu - The operating system for Expanse is CentOS
- For information on moving from Comet to Expanse, see the Comet to Expanse Transition Workshpo
If you have any difficulties completing these tasks, please contact SDSC Consulting group at help@xsede.org.
- Expanse Overview & Innovative Features
- Getting Started
- Modules
- Account Management
- Compiling & Linking
- Running Jobs
- Compiling and Running CPU Jobs
- Compiling and Running GPU Jobs
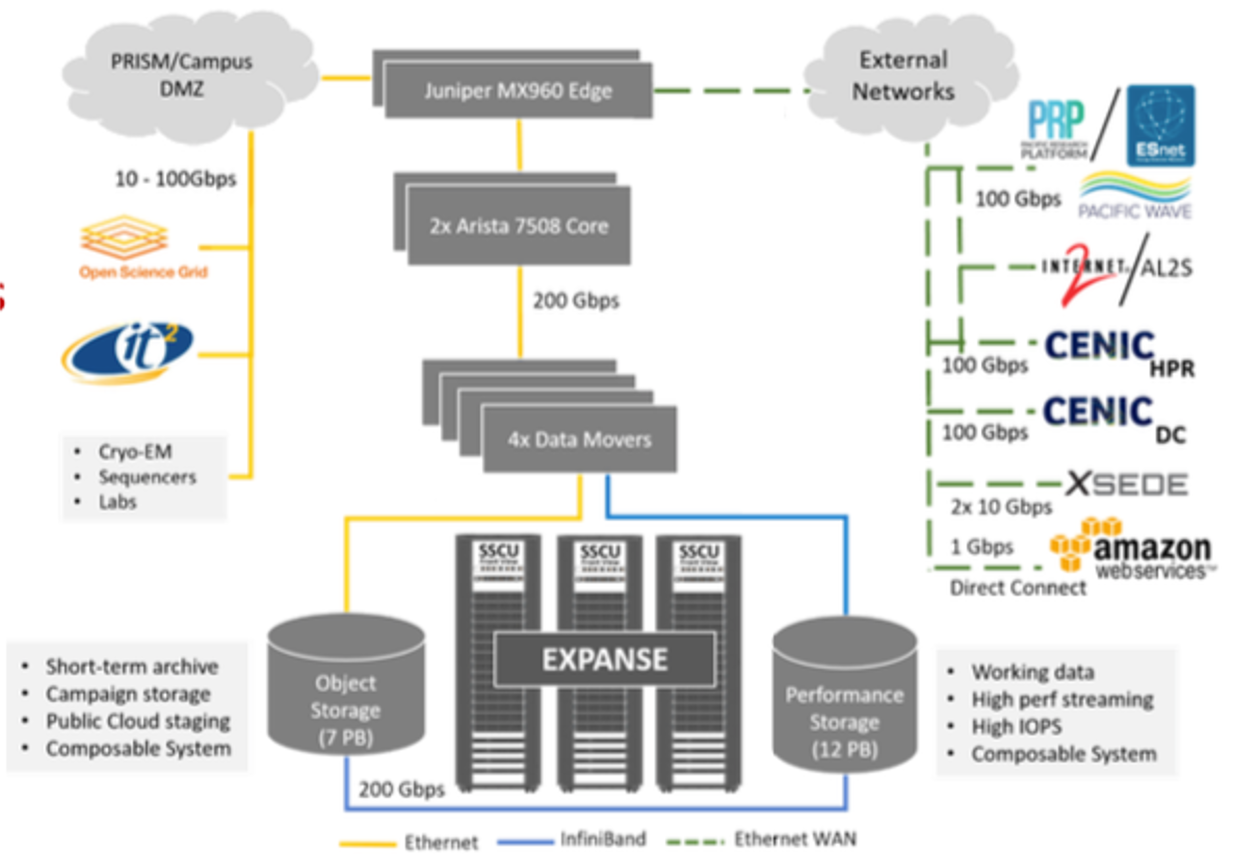
- Data and Storage, Globus Endpoints, Data Movers, Mount Points
- Final Comments
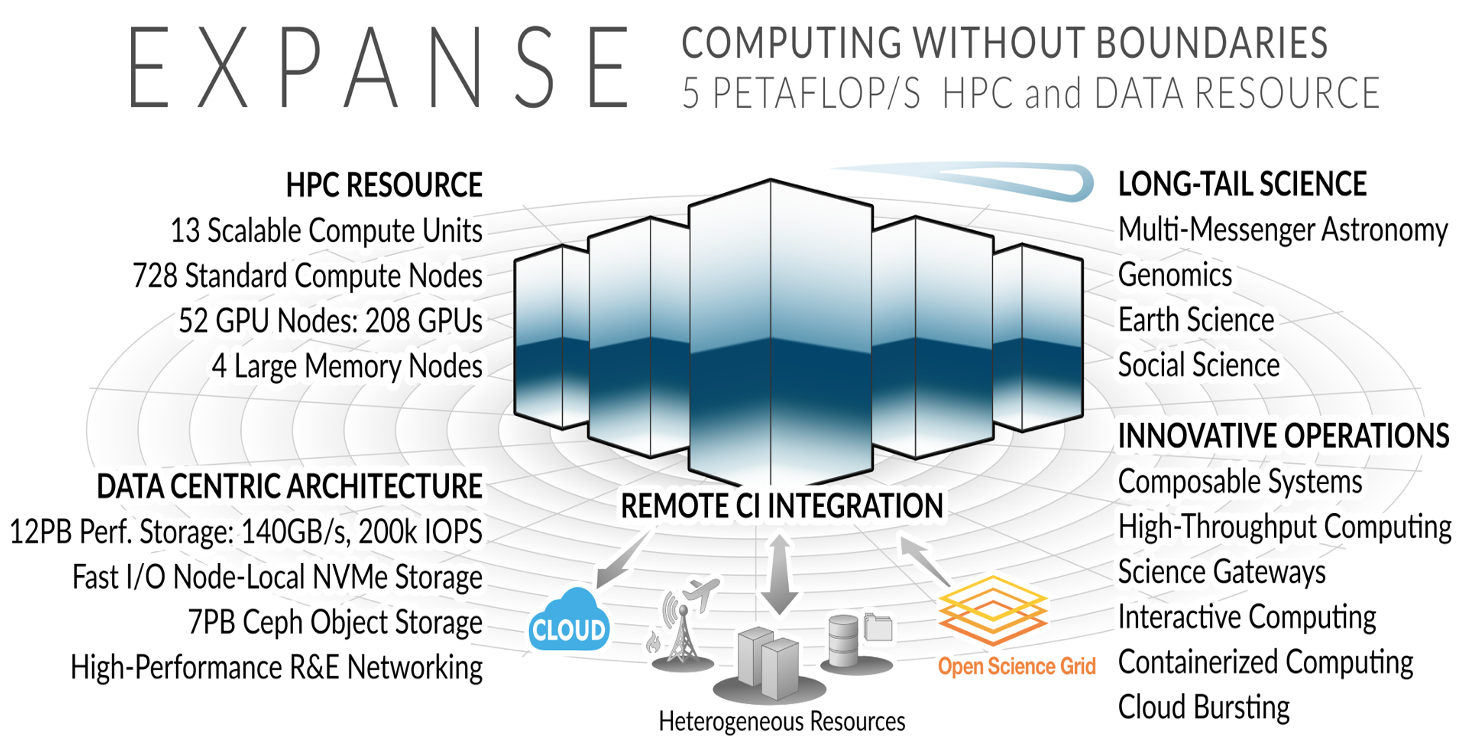
Expanse Overview:
HPC for the long tail of science:
- Designed by Dell and SDSC delivering 5.16 peak petaflops
- Designed and operated on the principle that the majority of computational research is performed at modest scale: large number jobs that run for less than 48 hours, but can be computationally intensvie and generate large amounts of data.
- An NSF-funded system available through the eXtreme Science and Engineering Discovery Environment (XSEDE) program (https://www.xsede.org).
- Supports interactive computing and science gateways.
- Will offer Composible Systems and Cloud Bursting.
System Summary
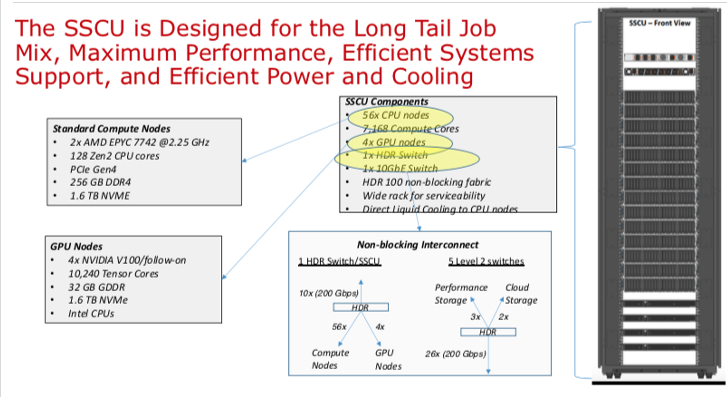
- 13 SDSC Scalable Compute Units (SSCU)
- 728 x 2s Standard Compute Nodes
- 93,184 Compute Cores
- 200 TB DDR4 Memory
- 52x 4-way GPU Nodes w/NVLINK
-
208 V100s * 4x 2TB Large Memory Nodes - HDR 100 non-blocking Fabric
- 12 PB Lustre High Performance
- Storage
- 7 PB Ceph Object Storage
- 1.2 PB on-node NVMe
- Dell EMC PowerEdge
- Direct Liquid Cooled
Expanse Scaleable Compute Unit
Expanse Connectivity Fabric
AMD EPYC 7742 Processor Architecture
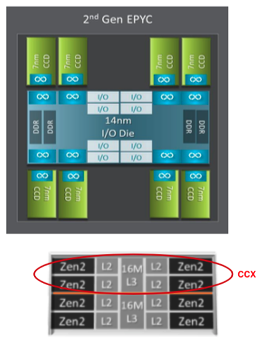
- 8 Core Complex Dies (CCDs).
- CCDs connect to memory, I/O, and each other through the I/O Die.
- 8 memory channels per socket.
- DDR4 memory at 3200MHz.
- PCI Gen4, up to 128 lanes of high speed I/O.
- Memory and I/O can be abstracted into separate quadrants each with 2 DIMM channels and 32 I/O lanes.
- 2 Core Complexes (CCXs) per CCD
- 4 Zen2 cores in each CCX share a16ML3 cache. Total of 16x16=256MB L3 cache.
- Each core includes a private 512KB L2 cache.
New Expanse Feature: Composable Systems
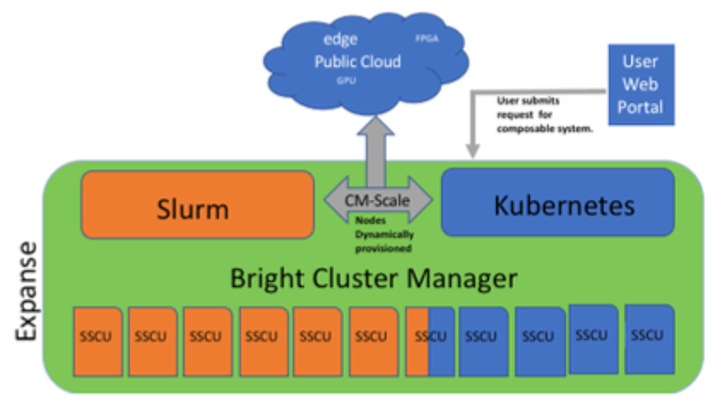 Composable Systems will support complex, distributed, workflows – making Expanse part of a larger CI ecosystem.
- Bright Cluster Manager + Kubernetes
- Core components developed via NSF- funded CHASE-CI (NSF Award # 1730158), and the Pacific Research Platform (NSF Award # 1541349)
- Requests for a composable system will be part of an XRAC request
- Advanced User Support resources available to assist with projects - this is part of our operations funding.
- Webinar scheduled for April 2021. See: https://www.sdsc.edu/education_and_training/training_hpc.html
New Expanse Feature: Cloud Bursting
Expanse will support integration with public clouds:

- Supports projects that share data, need access to novel technologies, and integrate cloud resources into workflows
- Slurm + in-house developed software + Terraform (Hashicorp)
- Early work funded internally and via NSF E-CAS/Internet2 project for CIPRES (Exploring Cloud for the Acceleration of Science, Award #1904444).
- Approach is cloud-agnostic and will support the major cloud providers.
- Users submit directly via Slurm, or as part of a composed system.
- Options for data movement: data in the cloud; remote mounting of file systems; cached filesystems (e.g., StashCache), and data transfer during the job.
- Funding for users cloud resources is not part of an Expanse award: the researcher must have access to cloud computing credits via other NSF awards and funding.
Getting Started on Expanse
In this Section:
ba
Expanse Accounts
You must have a expanse account in order to access the system.
- Obtain a trial account here: http://www.sdsc.edu/support/user_guides/expanse.html#trial_accounts
- You can use your XSEDE account.
Logging Onto Expanse
Expanse supports Single Sign-On through the XSEDE User Portal, from the command line using an XSEDE-wide password (coming soon, the Expanse User Portal). While CPU and GPU resources are allocated separately, the login nodes are the same. To log in to Expanse from the command line, use the hostname:
login.expanse.sdsc.edu
The following are examples of Secure Shell (ssh) commands that may be used to log in to Expanse:
ssh <your_username>@login.expanse.sdsc.edu
ssh -l <your_username> login.expanse.sdsc.edu
Details about how to access Expanse under different circumstances are described in the Expanse User Guide: https://www.sdsc.edu/support/user_guides/expanse.html#access
For instructions on how to use SSH, see Connecting to SDSC HPC Systems Guide. Below is the logon message – often called the MOTD (message of the day, located in /etc/motd). This has not been implemented at this point on Expanse
[username@localhost:~] ssh -Y expanse.sdsc.edu
Welcome to Bright release         9.0

                                                        Based on CentOS Linux 8
                                                                    ID: #000002

--------------------------------------------------------------------------------

                                 WELCOME TO
                  _______  __ ____  ___    _   _______ ______
                 / ____/ |/ // __ \/   |  / | / / ___// ____/
                / __/  |   // /_/ / /| | /  |/ /\__ \/ __/
               / /___ /   |/ ____/ ___ |/ /|  /___/ / /___
              /_____//_/|_/_/   /_/  |_/_/ |_//____/_____/

--------------------------------------------------------------------------------

Use the following commands to adjust your environment:

'module avail'            - show available modules
'module add <module>'     - adds a module to your environment for this session
'module initadd <module>' - configure module to be loaded at every login

-------------------------------------------------------------------------------
Last login: Fri Nov 1 11:16:02 2020 from 76.176.117.51
Example of a terminal connection/Unix login session:
localhost:~ username$ ssh -l username login.expanse.sdsc.edu
Last login: Wed Oct  7 11:04:17 2020 from 76.176.117.51
[username@login02 ~]$
[username@login02 ~]$ whoami
username
[username@login02 ~]$
[username@login02 ~]$ pwd
/home/username
[username@login02 ~]$
[username@login02 ~]$
[ Back to Getting Started ] [ Back to Top ]
Obtaining Tutorial Example Code
We will be clone the example code from GitHub repository located here: https://github.com/sdsc-hpc-training-org/expanse-101
The example below will be for anonymous HTTPS downloads
- Create a test directory hold the expanse example files: *
localhost:hpctrain username$ git clone https://github.com/sdsc-hpc-training-org/expanse-101.git
Cloning into 'expanse-101'...
remote: Enumerating objects: 79, done.
remote: Counting objects: 100% (79/79), done.
remote: Compressing objects: 100% (52/52), done.
remote: Total 302 (delta 36), reused 39 (delta 15), pack-reused 223
Receiving objects: 100% (302/302), 3.70 MiB | 4.66 MiB/s, done.
Resolving deltas: 100% (130/130), done.
localhost:hpctrain username$ ll
total 0
drwxr-xr-x   3 username  staff   96 Nov 18 08:12 .
drwxr-xr-x  11 username  staff  352 Nov 18 08:11 ..
drwxr-xr-x  10 username  staff  320 Nov 18 08:12 expanse-101
localhost:hpctrain username$ cd expanse-101/
localhost:expanse-101 username$ ls -al
total 48
drwxr-xr-x  10 username  staff   320 Nov 18 08:12 .
drwxr-xr-x   3 username  staff    96 Nov 18 08:12 ..
-rw-r--r--   1 username  staff  6148 Nov 18 08:12 .DS_Store
drwxr-xr-x  12 username  staff   384 Nov 18 08:12 .git
-rw-r--r--   1 username  staff   459 Nov 18 08:12 .gitignore
-rw-r--r--   1 username  staff  1005 Nov 18 08:12 README.md
drwxr-xr-x   4 username  staff   128 Nov 18 08:12 docs
drwxr-xr-x   7 username  staff   224 Nov 18 08:12 examples
drwxr-xr-x  12 username  staff   384 Nov 18 08:12 images
-rw-r--r--   1 username  staff  5061 Nov 18 08:12 running_jobs_on_expanse.md
Note: you can learn to create and modify directories as part of the Getting Started and Basic Skills preparation found here: https://github.com/sdsc-hpc-training-org/basic_skills
The examples directory contains the code we will cover in this tutorial:
[username@login01 examples]$ ls -al examples
total 88
drwxr-xr-x 6 username abc123 6 Oct  7 14:15 .
drwxr-xr-x 5 username abc123 8 Oct  7 14:15 ..
drwxr-xr-x 2 username abc123 6 Oct  7 14:15 HYBRID
drwxr-xr-x 2 username abc123 6 Oct  7 14:15 MPI
drwxr-xr-x 2 username abc123 6 Oct  7 14:15 OpenACC
drwxr-xr-x 2 username abc123 6 Oct  7 14:15 OPENMP
[username@login01 examples]$ ls -al examples/MPI
total 63
drwxr-xr-x 2 username abc123     6 Oct  7 14:15 .
drwxr-xr-x 6 username abc123     6 Oct  7 14:15 ..
-rwxr-xr-x 1 username abc123 21576 Oct  7 14:15 hello_mpi
-rw-r--r-- 1 username abc123   329 Oct  7 14:15 hello_mpi.f90
-rw-r--r-- 1 username abc123   464 Oct  7 14:15 hellompi-slurm.sb
-rw-r--r-- 1 username abc123   181 Oct  7 14:15 README.txt
All examples will contain source code, along with a batch script example so you can compile and run all examples on Expanse.
[ Back to Getting Started ] [ Back to Top ]
Expanse User Portal
- See: https://portal.expanse.sdsc.edu
- Quick and easy way for Expanse users to login, transfer and edit files and submit and monitor jobs.
- Gateway for launching interactive applications such as MATLAB, Rstudio
- Integrated web-based environment for file management and job submission.
- All Users with valid Expanse Allocation and XSEDE Based credentials have access via their XSEDE credentials..
[ Back to Getting Started ] [ Back to Top ]
Expanse Environment Modules: Customizing Your User Environment
The Environment Modules package provides for dynamic modification of your shell environment. Module commands set, change, or delete environment variables, typically in support of a particular application. They also let the user choose between different versions of the same software or different combinations of related codes. See the Expanse User Guide.
In this Section:
- Introduction to the Lua Lmod Module System
- Modules: Popular Lmod Commands
- Load and Check Modules and Environment
Introduction to the Lua Lmod Module System
- Expanse uses Lmod, a Lua based module system.
- See: https://lmod.readthedocs.io/en/latest/010_user.html
- Users setup custom environments by loading available modules into the shell environment, including needed compilers and libraries and the batch scheduler.
- What's the same as Comet:
- Dynamic modification of your shell environment
- User can set, change, or delete environment variables
- User chooses between different versions of the same software or different combinations of related codes.
- Modules: What's Different?
- Users will need to load the scheduler (e.g. slurm)
- Users will not see all available modules when they run command "module available" without loading a compiler.
- Use the command "module spider" option to see if a particular package exists and can be loaded, run command
- module spider
- module keywords
- module spider
- For additional details, and to identify module dependencies modules, use the command
- module spider
- module spider
- The module paths are different for the CPU and GPU nodes. Users can enable the paths by loading the following modules:
- module load cpu (for cpu nodes)
- module load gpu (for gpu nodes)
- note: avoid loading both modules
[ Back to Modules ] [ Back to Top ]
Modules: Popular Lmod Commands
Here are some common module commands and their descriptions:
| Lmod Command | Description |
|---|---|
| module list | List the modules that are currently loaded |
| module avail | List the modules that are available in environment |
| module spider | List of the modules and extensions currently available |
| module display | Show the environment variables used by |
| module unload | Remove |
| module load | Load |
| module swap | Replace |
| module help | get a list of all the commands that module knows about do: |
Lmod commands support short-hand notation, for example:
   ml foo == module load foo
   ml -bar"  == module unload bar
SDSC Guidance: add module calls to your environment and batch scripts
A few module command examples:
- Default environment:
list,li
(base) [username@login01 expanse-101]$ module list
Currently Loaded Modules:
  1) shared   2) cpu/1.0   3) DefaultModules
- List available modules:
available,avail,av
$ module av
[username@expanse-ln3:~] module av
(base) [username@login01 expanse-101]$ module available

--------------- /cm/shared/apps/spack/cpu/lmod/linux-centos8-x86_64/Core ----------------
   abaqus/2018     gaussian/16.C.01        gmp/6.1.2           mpfr/4.0.2
   aocc/2.2.0      gcc/7.5.0               intel/19.1.1.217    openjdk/11.0.2
   cmake/3.18.2    gcc/9.2.0               libtirpc/1.2.6      parallel/20200822
   emboss/6.6.0    gcc/10.2.0       (D)    matlab/2020b        subversion/1.14.0

--------------------------------- /cm/local/modulefiles ---------------------------------
   cluster-tools-dell/9.0        gcc/9.2.0                    null
   cluster-tools/9.0             gpu/1.0                      openldap
   cmd                           ipmitool/1.8.18              python3
   cmjob                         kubernetes/expanse/1.18.8    python37
   cpu/1.0                (L)    lua/5.3.5                    shared                (L)
   docker/19.03.5                luajit                       singularitypro/3.5
   dot                           module-git                   slurm/expanse/20.02.3
   freeipmi/1.6.4                module-info

-------------------------------- /usr/share/modulefiles ---------------------------------
   DefaultModules (L)    gct/6.2    globus/6.0

-------------------------------- /cm/shared/modulefiles ---------------------------------
   bonnie++/1.98                default-environment           netperf/2.7.0
   cm-pmix3/3.1.4               gdb/8.3.1                     openblas/dynamic/0.3.7
   cuda10.2/blas/10.2.89        hdf5/1.10.1                   openmpi/gcc/64/1.10.7
   cuda10.2/fft/10.2.89         hdf5_18/1.8.21                sdsc/1.0
   cuda10.2/nsight/10.2.89      hwloc/1.11.11                 ucx/1.6.1
   cuda10.2/profiler/10.2.89    iozone/3_487
   cuda10.2/toolkit/10.2.89     netcdf/gcc/64/gcc/64/4.7.3

  Where:
   L:  Module is loaded
   D:  Default Module
Note: Module defaults are chosen based on Find First Rules due to Name/Version/Version modules found in the module tree. See https://lmod.readthedocs.io/en/latest/060_locating.html for details.
Use module spider to find all possible modules and extensions.
(base) [username@login02 ~]$ module spider MPI
-------------------------------------------------------------------------------------
  intel-mpi: intel-mpi/2019.8.254
-------------------------------------------------------------------------------------
    You will need to load all module(s) on any one of the lines below before the "intel-mpi/2019.8.254" module is available to load.

      cpu/1.0  gcc/10.2.0
      cpu/1.0  intel/19.1.1.217
      gpu/1.0
      gpu/1.0  intel/19.0.5.281
      gpu/1.0  pgi/20.4

    Help:
      Intel MPI
-------------------------------------------------------------------------------------
  openmpi:
-------------------------------------------------------------------------------------
     Versions:
        openmpi/3.1.6
        openmpi/4.0.4-nocuda
        openmpi/4.0.4
-------------------------------------------------------------------------------------
  For detailed information about a specific "openmpi" package (including how to load the modules) use the module's full name. Note that names that have a trailing (E) are extensions provided by other modules.
  For example:

     $ module spider openmpi/4.0.4
-------------------------------------------------------------------------------------
-------------------------------------------------------------------------------------
  openmpi/gcc/64: openmpi/gcc/64/1.10.7
-------------------------------------------------------------------------------------
    You will need to load all module(s) on any one of the lines below before the "openmpi/gcc/64/1.10.7" module is available to load.
      shared
    Help:
        Adds OpenMPI to your environment variables,
[ Back to Modules ] [ Back to Top ]
Load and Check Modules and Environment
In this example, we will add the SLURM library, and and verify that it is in your environment
- Check login module environment
(base) [username@login01 ~]$ module li

Currently Loaded Modules:
  1) shared   2) cpu/1.0   3) DefaultModules
- Note that SLURM is not in the environment. Check environment looking for SLURM commands
(base) [username@login01 ~]$ which squeue
/usr/bin/which: no squeue in (/home/username/miniconda3/bin/conda:/home/username/miniconda3/bin:/home/username/miniconda3/condabin:/usr/local/bin:/usr/bin:/usr/local/sbin:/usr/sbin:/opt/dell/srvadmin/bin:/home/username/.local/bin:/home/username/bin)
- SLURM commands do not exist, so we need to load that module.
(base) [username@login01 ~]$ module load slurm
(base) [username@login01 ~]$ which squeue
/cm/shared/apps/slurm/current/bin/squeue
- Display loaded module details:
(base) [username@login02 ~]$ module display slurm
-------------------------------------------------------------------------------------
   /cm/local/modulefiles/slurm/expanse/20.02.3:
-------------------------------------------------------------------------------------
whatis("Adds Slurm to your environment ")
setenv("CMD_WLM_CLUSTER_NAME","expanse")
setenv("SLURM_CONF","/cm/shared/apps/slurm/var/etc/expanse/slurm.conf")
prepend_path("PATH","/cm/shared/apps/slurm/current/bin")
prepend_path("PATH","/cm/shared/apps/slurm/current/sbin")
prepend_path("MANPATH","/cm/shared/apps/slurm/current/man")
prepend_path("LD_LIBRARY_PATH","/cm/shared/apps/slurm/current/lib64")
prepend_path("LD_LIBRARY_PATH","/cm/shared/apps/slurm/current/lib64/slurm")
prepend_path("LIBRARY_PATH","/cm/shared/apps/slurm/current/lib64")
prepend_path("LIBRARY_PATH","/cm/shared/apps/slurm/current/lib64/slurm")
prepend_path("CPATH","/cm/shared/apps/slurm/current/include")
help([[ Adds Slurm to your environment
]])
Once you have loaded the modules, you can check the system variables that are available for you to use.
- To see all variable, run the
envcommand. Typically, you will see more than 60 lines containing information such as your login name, shell, your home directory:
[username@expanse-ln3 IBRUN]$ env
CONDA_EXE=/home/username/miniconda3/bin/conda
__LMOD_REF_COUNT_PATH=/cm/shared/apps/slurm/current/sbin:1;/cm/shared/apps/slurm/current/bin:1;/home/username/miniconda3/bin/conda:1;/home/username/miniconda3/bin:1;/home/username/miniconda3/condabin:1;/usr/local/bin:1;/usr/bin:1;/usr/local/sbin:1;/usr/sbin:1;/opt/dell/srvadmin/bin:1;/home/username/.local/bin:1;/home/username/bin:1
HOSTNAME=login02
USER=username
HOME=/home/username
CONDA_PYTHON_EXE=/home/username/miniconda3/bin/python
BASH_ENV=/usr/share/lmod/lmod/init/bash
BASHRC_READ=1
LIBRARY_PATH=/cm/shared/apps/slurm/current/lib64/slurm:/cm/shared/apps/slurm/current/lib64
SLURM_CONF=/cm/shared/apps/slurm/var/etc/expanse/slurm.conf
LOADEDMODULES=shared:cpu/1.0:DefaultModules:slurm/expanse/20.02.3
__LMOD_REF_COUNT_MANPATH=/cm/shared/apps/slurm/current/man:1;/usr/share/lmod/lmod/share/man:1;/usr/local/. . . .
MANPATH=/cm/shared/apps/slurm/current/man:/usr/share/lmod/lmod/share/man:/usr/local/share/man:/usr/share/man:/cm/local/apps/environment-modules/current/share/man
MODULEPATH=/cm/shared/apps/spack/cpu/lmod/linux-centos8-x86_64/Core:/cm/local/modulefiles:/etc/modulefiles:/usr/share/modulefiles:/usr/share/Modules/modulefiles:/cm/shared/modulefiles
MODULEPATH_ROOT=/usr/share/modulefiles
PATH=/cm/shared/apps/slurm/current/sbin:/cm/shared/apps/slurm/current/bin:/home/username/miniconda3/bin/conda:/home/username/miniconda3/bin:/home/username/miniconda3/condabin:/usr/local/bin:/usr/bin:/usr/local/sbin:/usr/sbin:/opt/dell/srvadmin/bin:/home/username/.local/bin:/home/username/bin
_LMFILES_=/cm/local/modulefiles/shared:/cm/local/modulefiles/cpu/1.0.lua:/usr/share/modulefiles/DefaultModules.lua:/cm/local/modulefiles/slurm/expanse/20.02.3
MODULESHOME=/usr/share/lmod/lmod
CONDA_DEFAULT_ENV=base
To see the value for any of these variables, use the echo command. In this example we show how to activate your miniconda environment so you can run Jupyter Notebooks:
(base) [username@login02 ~]$ echo $CONDA_PYTHON_EXE
[username@login02 ~]$
[username@login02 ~]$ conda activate
-bash: conda: command not found
[username@login02 ~]$ . /home/$USER/miniconda3/etc/profile.d/conda.sh
[username@login02 ~]$ conda activate
(base) [username@login02 ~]$ which jupyter
~/miniconda3/bin/jupyter
(base) [username@login02 ~]$ echo $CONDA_PYTHON_EXE
/home/username/miniconda3/bin/python
(base) [username@login02 ~]$
[ Back to Modules ] [ Back to Top ]
Loading Modules During Login
You can override, and add to the standard set of login modules in two ways.
- The first is adding module commands to your personal startup files.
- The second way is through the "module save" command. Note: make sure that you always want the module loaded at login
For Bash: put the following block into your ~/.bash_profile file:
           if [ -f ~/.bashrc ]; then
                            . ~/.bashrc
                    fi
Place the following in your ~/.bashrc file:
           if [ -z "$BASHRC_READ" ]; then
                        export BASHRC_READ=1
                        # Place any module commands here
                   # module load hdf5
                fi
- First edit your
.bashrcand.bash_profilefiles:
[username@login02 ~]$ cat .bash_profile
# .bash_profile
# Get the aliases and functions
if [ -f ~/.bashrc ]; then
. ~/.bashrc
fi
[SNIP]
[username@login01 ~]$
[username@login02 ~]$ cat .bashrc
# .bashrc
# Source global definitions
if [ -f /etc/bashrc ]; then
. /etc/bashrc
fi
if [ -z "$BASHRC_READ" ]; then
   export BASHRC_READ=1
   # Place any module commands here
   module load hdf5
Fi
[SNIP]
- Next LOGOUT and LOG BACK IN:
(base) [username@login02 ~]$ env | grep slurm
[snip]
MANPATH=/cm/shared/apps/slurm/current/man:/usr/share/lmod/lmod/share/man:/usr/local/share/man:/usr/share/man:/cm/local/apps/environment-modules/current/share/man
PATH=/cm/shared/apps/slurm/current/sbin:/cm/shared/apps/slurm/current/bin:/home/username/miniconda3/bin/conda:/home/username/miniconda3/bin:/home/username/miniconda3/condabin:/usr/local/bin:/usr/bin:/usr/local/sbin:/usr/sbin:/opt/dell/srvadmin/bin:/home/username/.local/bin:/home/username/bin
[snip]
(base) [username@login02 ~]$ which squeue
/cm/shared/apps/slurm/current/bin/squeue
[ Back to Modules ] [ Back to Top ]
Troubleshooting:Module Error
Sometimes this error is encountered when switching from one shell to another or attempting to run the module command from within a shell script or batch job. The module command may not be inherited between the shells. To keep this from happening, execute the following command:
[expanse-ln3:~]source /etc/profile.d/modules.sh
OR add this command to your shell script (including Slurm batch scripts)
[ Back to Modules ] [ Back to Top ]
Managing Accounts on Expanse
This section focuses on how to manage your allocations on Expanse. For full details, see the Expanse User Guide. Contents
Expanse Accounts
You must have a expanse account in order to access the system.
- To obtain a trial account or an expedited allocation, go here: http://www.sdsc.edu/support/user_guides/expanse.html#trial_accounts
- To obtain a trial account or an expedited allocation, go here: http://www.sdsc.edu/support/user_guides/expanse.html#trial_accounts
- Note: You may need to create an XSEDE portal account. XSEDE portal accounts are open to the general community. However, access and allocations to specific XSEDE or SDSC systems will depend on the details of an allocation request.
[ Back to Accounts ] [ Back to Top ]
Logging Onto Expanse
Expanse supports Single Sign-On through the XSEDE User Portal, from the command line using an XSEDE-wide password. While CPU and GPU resources are allocated separately, the login nodes are the same. To log in to Expanse from the command line, use the hostname:
login.expanse.sdsc.edu
The following are examples of Secure Shell (ssh) commands that may be used to log in to Expanse:
ssh <your_username>@login.expanse.sdsc.edu
ssh -l <your_username> login.expanse.sdsc.edu
-
Details about how to access Expanse under different circumstances are described in the Expanse User Guide: https://www.sdsc.edu/support/user_guides/expanse.html#access
-
For instructions on how to use SSH, see our tutorial: Connecting to SDSC HPC Systems Guide.
-
Below is an example of the logon message – often called the MOTD (message of the day, located in /etc/motd). This has not been implemented at this point on Expanse
[username@localhost:~] ssh expanse.sdsc.edu
Welcome to Bright release         9.0

                                                        Based on CentOS Linux 8
                                                                    ID: #000002

--------------------------------------------------------------------------------

                                 WELCOME TO
                  _______  __ ____  ___    _   _______ ______
                 / ____/ |/ // __ \/   |  / | / / ___// ____/
                / __/  |   // /_/ / /| | /  |/ /\__ \/ __/
               / /___ /   |/ ____/ ___ |/ /|  /___/ / /___
              /_____//_/|_/_/   /_/  |_/_/ |_//____/_____/

--------------------------------------------------------------------------------

Use the following commands to adjust your environment:

'module avail'            - show available modules
'module add <module>'     - adds a module to your environment for this session
'module initadd <module>' - configure module to be loaded at every login

-------------------------------------------------------------------------------
Last login: Fri Nov 1 11:16:02 2020 from 76.176.117.51
Example of a terminal connection/Unix login session:
(base) localhost:~ username$ ssh -l username login.expanse.sdsc.edu
Last login: Wed Oct  7 11:04:17 2020 from 76.176.117.51
[username@login02 ~]$
[username@login02 ~]$ whoami
username
[username@login02 ~]$
[username@login02 ~]$ pwd
/home/username
[username@login02 ~]$
[username@login02 ~]$
[ Back to Accounts ] [ Back to Top ]
Obtaining Tutorial Example Code
We will be clone the example code from GitHub repository located here: https://github.com/sdsc-hpc-training-org/expanse-101
The example below will be for anonymous HTTPS downloads
- Create a test directory hold the expanse example files:
localhost:hpctrain username$ git clone https://github.com/sdsc-hpc-training-org/expanse-101.git
Cloning into 'expanse-101'...
remote: Enumerating objects: 79, done.
remote: Counting objects: 100% (79/79), done.
remote: Compressing objects: 100% (52/52), done.
remote: Total 302 (delta 36), reused 39 (delta 15), pack-reused 223
Receiving objects: 100% (302/302), 3.70 MiB | 4.66 MiB/s, done.
Resolving deltas: 100% (130/130), done.
localhost:hpctrain username$ ll
total 0
drwxr-xr-x   3 username  staff   96 Nov 18 08:12 .
drwxr-xr-x  11 username  staff  352 Nov 18 08:11 ..
drwxr-xr-x  10 username  staff  320 Nov 18 08:12 expanse-101
localhost:hpctrain username$ cd expanse-101/
localhost:expanse-101 username$ ls -al
total 48
drwxr-xr-x  10 username  staff   320 Nov 18 08:12 .
drwxr-xr-x   3 username  staff    96 Nov 18 08:12 ..
-rw-r--r--   1 username  staff  6148 Nov 18 08:12 .DS_Store
drwxr-xr-x  12 username  staff   384 Nov 18 08:12 .git
-rw-r--r--   1 username  staff   459 Nov 18 08:12 .gitignore
-rw-r--r--   1 username  staff  1005 Nov 18 08:12 README.md
drwxr-xr-x   4 username  staff   128 Nov 18 08:12 docs
drwxr-xr-x   7 username  staff   224 Nov 18 08:12 examples
drwxr-xr-x  12 username  staff   384 Nov 18 08:12 images
-rw-r--r--   1 username  staff  5061 Nov 18 08:12 running_jobs_on_expanse.md
Note: you can learn to create and modify directories as part of the Getting Started and Basic Skills preparation found here: https://github.com/sdsc-hpc-training-org/basic_skills
The examples directory contains the code we will cover in this tutorial:
[username@login01 examples]$ ls -al examples
total 88
drwxr-xr-x 6 username abc123 6 Oct  7 14:15 .
drwxr-xr-x 5 username abc123 8 Oct  7 14:15 ..
drwxr-xr-x 2 username abc123 6 Oct  7 14:15 HYBRID
drwxr-xr-x 2 username abc123 6 Oct  7 14:15 MPI
drwxr-xr-x 2 username abc123 6 Oct  7 14:15 OpenACC
drwxr-xr-x 2 username abc123 6 Oct  7 14:15 OPENMP
[username@login01 examples]$ ls -al examples/MPI
total 63
drwxr-xr-x 2 username abc123     6 Oct  7 14:15 .
drwxr-xr-x 6 username abc123     6 Oct  7 14:15 ..
-rwxr-xr-x 1 username abc123 21576 Oct  7 14:15 hello_mpi
-rw-r--r-- 1 username abc123   329 Oct  7 14:15 hello_mpi.f90
-rw-r--r-- 1 username abc123   464 Oct  7 14:15 hellompi-slurm.sb
-rw-r--r-- 1 username abc123   181 Oct  7 14:15 README.txt
All examples will contain source code, along with a batch script example so you can compile and run all examples on Expanse.
[ Back to Accounts ] [ Back to Top ]
Compiling & Linking Code
Expanse provides the Intel, Portland Group (PGI), and GNU compilers along with multiple MPI implementations (MVAPICH2, MPICH2, OpenMPI). Most applications will achieve the best performance on Expanse using the Intel compilers and MVAPICH2 and the majority of libraries installed on Expanse have been built using this combination.
Other compilers and versions can be installed by Expanse staff on request. For more information, see the [Expanse User Guide.] (https://www.sdsc.edu/support/user_guides/expanse.html#compiling)
Supported Compilers
Expanse CPU and GPU nodes have different compiler libraries.
CPU Nodes
- GNU, Intel, AOCC (AMD) compilers
- Multiple MPI implementations (OpenMPI, MVAPICH2, and IntelMPI).
- A majority of applications have been built using gcc/10.2.0 which features AMD Rome specific optimization flags (-march=znver2).
- Intel, and AOCC compilers all have flags to support Advanced Vector Extensions 2 (AVX2).
Users should evaluate their application for best compiler and library selection. GNU, Intel, and AOCC compilers all have flags to support Advanced Vector Extensions 2 (AVX2). Using AVX2, up to eight floating point operations can be executed per cycle per core, potentially doubling the performance relative to non-AVX2 processors running at the same clock speed. Note that AVX2 support is not enabled by default and compiler flags must be set as described below.
GPU Nodes
Expanse GPU nodes have GNU, Intel, and PGI compilers available along with multiple MPI implementations (OpenMPI, IntelMPI, and MVAPICH2). The gcc/10.2.0, Intel, and PGI compilers have specific flags for the Cascade Lake architecture. Users should evaluate their application for best compiler and library selections.
Note: that the login nodes are not the same as the GPU nodes, therefore all GPU codes must be compiled by requesting an interactive session on the GPU nodes.
In this tutorial, we include several hands-on examples that cover many of the cases in the table:
- MPI
- OpenMP
- HYBRID
- GPU
- Local scratch
[ Back to Running Jobs ] [ Back to Top
AMD Optimizing C/C++ Compiler (AOCC)
The AMD Optimizing C/C++ Compiler (AOCC) is only available on CPU nodes. AMD compilers can be loaded by executing the following commands at the Linux prompt:
module load aocc
For more information on the AMD compilers run:
[flang | clang ] -help
Suggested Compilers to used based on programming model and languages:
| Language | Serial | MPI | OpenMP | MPI + OpenMP |
|---|---|---|---|---|
| Fortran | flang | mpif90 | ifort -fopenmp | mpif90 -fopenmp |
| C | clang | mpiclang | icc -fopenmp | mpicc -fopenmp |
| C++ | clang++ | mpiclang | icpc -fopenmp | mpicxx -fopenmp |
Using the AOCC Compilers
- If you have modified your environment, you can reload by executing the module purge & load commands at the Linux prompt, or placing the load command in your startup file (~/.cshrc or ~/.bashrc)
- Note: The examples below are for the simple "hellompi" examples shown below
[username@login02 ~]$ module list
Currently Loaded Modules:
  1) shared   2) cpu/1.0   3) DefaultModules   4) hdf5/1.10.1   5) intel/ 19.1.1.217
## need to change multiple modules
[username@login02 ~]$ module purge
[username@login02 ~]$ module list
No modules loaded
[username@login02 ~]$ module load slurm
[username@login02 ~]$ module load cpu
[username@login02 ~]$ module load gcc
[username@login02 ~]$ module load openmpi/4.0.4
[username@login02 ~]$ module list
Currently Loaded Modules:
  1) slurm/expanse/20.02.3   2) cpu/1.0   3) gcc/10.2.0   4) openmpi/4.0.4
[username@login02 MPI]$ module swap intel aocc
Due to MODULEPATH changes, the following have been reloaded:
  1) openmpi/4.0.4
[username@login02 ~]$ module list
Currently Loaded Modules:
  1) slurm/expanse/20.02.3   2) cpu/1.0   3) aocc/2.2.0   4) openmpi/4.0.4
[username@login02 ~]$
[ Back to Running Jobs ] [ Back to Top
Intel Compilers:
The Intel compilers and the MVAPICH2 MPI implementation will be loaded by default. If you have modified your environment, you can reload by executing the following commands at the Linux prompt or placing in your startup file (~/.cshrc or ~/.bashrc) or into a module load script (see above).
module purge
module load intel mvapich2_ib
For AVX2 support, compile with the -xHOST option. Note that -xHOST alone does not enable aggressive optimization, so compilation with -O3 is also suggested. The -fast flag invokes -xHOST, but should be avoided since it also turns on interprocedural optimization (-ipo), which may cause problems in some instances.
Intel MKL libraries are available as part of the "intel" modules on Expanse. Once this module is loaded, the environment variable MKL_ROOT points to the location of the mkl libraries. The MKL link advisor can be used to ascertain the link line (change the MKL_ROOT aspect appropriately).
In the example below, we are working with the HPC examples that can be found in
[user@expanse-14-01:~/expanse-examples/expanse101/MKL] pwd
/home/user/expanse-examples/expanse101/MKL
[user@expanse-14-01:~/expanse-examples/expanse101/MKL] ls -al
total 25991
drwxr-xr-x  2 user abc123        9 Nov 25 17:20 .
drwxr-xr-x 16 user abc123       16 Aug  5 19:02 ..
-rw-r--r--  1 user abc123      325 Aug  5 19:02 compile.txt
-rw-r--r--  1 user abc123     6380 Aug  5 19:02 pdpttr.c
-rwxr-xr-x  1 user abc123 44825440 Nov 25 16:55 pdpttr.exe
-rw-r--r--  1 user abc123      188 Nov 25 16:57 scalapack.20294236.expanse-07-27.out
-rw-r--r--  1 user abc123      376 Aug  5 19:02 scalapack.sb
The file compile.txt contains the full command to compile the pdpttr.c program statically linking 64 bit scalapack libraries on Expanse:
[user@expanse-14-01:~/expanse-examples/expanse101/MKL] cat compile.txt
mpicc -o pdpttr.exe pdpttr.c /opt/intel/2018.1.163/compilers_and_libraries_2018.1.163/linux/mkl/lib/intel64/libmkl_scalapack_lp64.a -Wl,--start-group /opt/intel/2018.1.163/compilers_and_libraries_2018.1.163/linux/mkl/lib/intel64/libmkl_intel_lp64.a /opt/intel/2018.1.163/compilers_and_libraries_2018.1.163/linux/mkl/lib/intel64/libmkl_sequential.a /opt/intel/2018.1.163/compilers_and_libraries_2018.1.163/linux/mkl/lib/intel64/libmkl_core.a /opt/intel/2018.1.163/compilers_and_libraries_2018.1.163/linux/mkl/lib/intel64/libmkl_blacs_intelmpi_lp64.a -Wl,--end-group -lpthread -lm -ldl
Run the command:
[user@expanse-14-01:~/expanse-examples/expanse101/MKL] mpicc -o pdpttr.exe pdpttr.c -I$MKL_ROOT/include ${MKL_ROOT}/lib/intel64/libmkl_scalapack_lp64.a -Wl,--start-group ${MKL_ROOT}/lib/intel64/libmkl_intel_lp64.a ${MKL_ROOT}/lib/intel64/libmkl_core.a ${MKL_ROOT}/lib/intel64/libmkl_sequential.a -Wl,--end-group ${MKL_ROOT}/lib/intel64/libmkl_blacs_intelmpi_lp64.a -lpthread -lm
| For more information on the Intel compilers run: [ifort | icc | icpc] -help |
GNU Compilers
The GNU compilers can be loaded by executing the following commands at the Linux prompt or placing in your startup files (~/.cshrc or ~/.bashrc)
module purge
module load gnu openmpi_ib
For AVX support, compile with -mavx. Note that AVX support is only available in version 4.7 or later, so it is necessary to explicitly load the gnu/4.9.2 module until such time that it becomes the default.
| For more information on the GNU compilers: man [gfortran | gcc | g++] |
| Serial | MPI | OpenMP | MPI+OpenMP | |
|---|---|---|---|---|
| Fortran | gfortran | mpif90 | gfortran -fopenmp | mpif90 -fopenmp |
| C | gcc | mpicc | gcc -fopenmp | mpicc -fopenmp |
| C++ | g++ | mpicxx | g++ -fopenmp | mpicxx -fopenmp |
PGI Compilers
The PGI compilers can be loaded by executing the following commands at the Linux prompt or placing in your startup file (~/.cshrc or ~/.bashrc)
module purge
module load pgi mvapich2_ib
For AVX support, compile with -fast
| For more information on the PGI compilers: man [pgf90 | pgcc | pgCC] |
| Serial | MPI | OpenMP | MPI+OpenMP | |
|---|---|---|---|---|
| pgf90 | mpif90 | pgf90 -mp | mpif90 -mp | |
| C | pgcc | mpicc | pgcc -mp | mpicc -mp |
| C++ | pgCC | mpicxx | pgCC -mp | mpicxx -mp |
Running Jobs on Expanse
In this Section:
Parallel Models
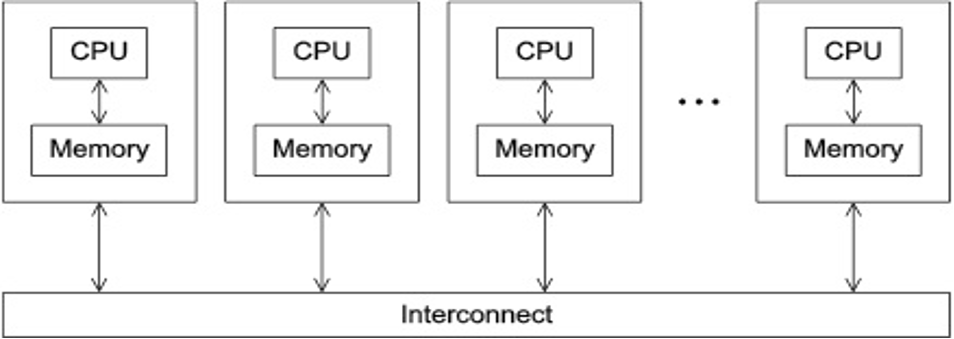
Parallel Models: Distributed Memory
- Programs that run asynchronously, pass messages for communication and coordination between resources.
- Examples include: SOA-based systems, massively multiplayer online games, peer-to-peer apps.
- Different types of implementations for the message passing mechanism: HTTP, RPC-like connectors, message queues
- HPC historically uses the Message Passing Interface (MPI)
Parallel Models: Shared Memory
- CPUs all share same localized memory (SHMEM)
- Coordination and communication between tasks via interprocessor communication (IPC) or virtual memory mappings.
- May use: uniform or non-uniform memory access (UMA or NUMA); cache-only memory architecture (COMA).
- Most common HPC API's for using SHMEM:
- Portable Operating System Interface (POSIX); Open Multi-Processing (OpenMP) designed for parallel computing – best for multi-core computing.
[ Back to Running Jobs ] [ Back to Top
Methods for Running Jobs on Expanse
Batch Jobs
- Batch Jobs are used to submit batch scripts to Slurm from the login nodes. You need to specify
- Partition (queue)
- Time limit for the run (maximum of 48 hours)
- Number of nodes, tasks per node; Memory requirements (if any)
- Job name, output file location; Email info, configuration
- When you run in the batch mode, you submit jobs to be run on the compute nodes using the sbatch command.
- Remember that computationally intensive jobs should be run only on the compute nodes and not the login nodes.
- Expanse places limits on the number of jobs queued and running on a per group (allocation) and partition basis.
- Please note that submitting a large number of jobs (especially very short ones) can impact the overall scheduler response for all users.
Interactive Jobs
- Interactive Jobs: Use the srun command to obtain nodes for ‘real-time, live' command line access to a compute node: CPU:
srun --partition=debug --qos=debug-normal --pty --account=abc123 --nodes=1 --ntasks-per-node=128 --mem=248 -t 00:30:00 --wait=0 --export=ALL /bin/bash
GPU:
srun --pty --account=abc123 --nodes=1 --ntasks-per-node=1 --cpus-per-task=10 -p gpu-debug --gpus=1 -t 00:10:00 /bin/bash
[ Back to Running Jobs ] [ Back to Top
Command Line Jobs
The login nodes are meant for compilation, file editing, simple data analysis, and other tasks that use minimal compute resources. Do not run parallel or large jobs on the login nodes - even for simple tests. Even if you could run a simple test on the command line on the login node, full tests should not be run on the login node because the performance will be adversely impacted by all the other tasks and login activities of the other users who are logged onto the same node. For example, at the moment that this note was written, a gzip process was consuming 98% of the CPU time: [username@comet-ln3 OPENMP]$ top ... PID USER PR NI VIRT RES SHR S %CPU %MEM TIME+ COMMAND 19937 XXXXX 20 0 4304 680 300 R 98.2 0.0 0:19.45 gzip
Commands that you type into the terminal and run on the sytem are considered jobs and they consume resources. Computationally intensive jobs should be run only on the compute nodes and not the login nodes.
Back to Running Jobs
Back to Top
- Expanse uses the Simple Linux Utility for Resource Management (SLURM) resource manager. Slurm is an open source, fault-tolerant, and highly scalable cluster management and job scheduling system for large and small Linux clusters https://slurm.schedmd.com/documentation.html.
| logging on to Expanse | SLURM Architecture |
|---|---|
 |  |
| User logs onto Expanse, and submits a batch script to the SLURM Controller daemon | SLURM parses the batch script for correct syntax and then queues up the job until the requested resources are available |
- SLURM is the "Glue" for parallel computer to schedule and execute jobs
- Role: Allocate resources within a cluster
- Nodes (unique IP address)
- Interconnect/switches
- Generic resources (e.g. GPUs)
- Launch and otherwise manage jobs
Back to Running Jobs
Back to Top
### SLURM Partitions About Partitions
| Partition Name | Max Walltime | Max Nodes/ Job | Max Running Jobs | Max Running + Queued Jobs | Charge Factor | Comments |
|---|---|---|---|---|---|---|
| compute | 48 hrs | 32 | 64 | 128 | 1 | Used for exclusive access to regular compute nodes |
| shared | 48 hrs | 1 | 4096 | 4096 | 1 | Single-node jobs using fewer than 128 cores |
| gpu | 48 hrs | 4 | 4 | 8 (32 Tres GPU) | 1 | Used for exclusive access to the GPU nodes |
| gpu-shared | 48 hrs | 1 | 16 | 24 (24 Tres GPU) | 1 | Single-node job using fewer than 4 GPUs |
| large-shared | 48 hrs | 1 | 1 | 4 | 1 | Single-node jobs using large memory up to 2 TB (minimum memory required 256G) |
| debug | 15 min | 2 | 1 | 2 | 1 | Priority access to compute nodes set aside for testing of jobs with short walltime and limited resources |
| gpu-debug | 15 min | 2 | 1 | 2 | 1 | ** Priority access to gpu nodes set aside for testing of jobs with short walltime and limited resources |
| preempt | 7 days | 32 | 128 | 0.8 | Discounted jobs to run on free nodes that can be pre-empted by jobs submited to any other queue (NO REFUNDS) | |
| gpu-preempt | 7 days | 1 | 24 (24 Tres GPU) | 0.8 | Discounted jobs to run on unallocated nodes that can be pre-empted by jobs submitted to higher priority queues (NO REFUNDS |
Back to Running Jobs
Back to Top
Common SLURM Commands
Here are a few key Slurm commands. For more information, run the man slurm or see this page:
- Submit jobs using the sbatch command:
$ sbatch mycode-slurm.sb
- Submitted batch job 8718049 Check job status using the squeue command:
$ squeue -u $USER
             JOBID PARTITION     NAME     USER      ST       TIME  NODES  NODELIST(REASON)
           8718049   compute       mycode user   PD       0:00       1               (Priority)
- Once the job is running:
$ squeue -u $USER JOBID PARTITION NAME USER ST TIME NODES NODELIST(REASON) 8718049 debug mycode user R 0:02 1 expanse-14-01 - Cancel a running job:
$ scancel 8718049
Back to Running Jobs
Back to Top
SLURM Batch Script Example
Below is an example of a batch script that prints our your environment on the compute node:
[username@login01 ENV_INFO]$ cat env-slurm.sb
#!/bin/bash
#SBATCH --job-name="envinfo"
#SBATCH --output="envinfo.%j.%N.out"
#SBATCH --partition=compute
#SBATCH --nodes=1
#SBATCH --ntasks-per-node=1
#SBATCH --export=ALL
#SBATCH -t 00:01:00

## Environment
module purge
module load slurm
module load cpu
##  perform some basic unix commands
echo "----------------------------------"
echo "hostname= " `hostname`
echo "date= " `date`
echo "whoami= " `whoami`
echo "pwd= " `pwd`
echo "module list= " `module list`
echo "----------------------------------"
echo "env= " `env`
echo "----------------------------------"
- Portion of the output generated by this script:
[username@login01 ENV_INFO]$ cat envinfo.108867.exp-6-56.out
----------------------------------
hostname=  exp-6-56
date=  Wed Oct 7 23:45:43 PDT 2020
whoami=  username
pwd=  /home/username/DEMO/ENV_INFO
Currently Loaded Modules:
  1) slurm/expanse/20.02.3   2) cpu/1.0
----------------------------------
env=  SLURM_MEM_PER_CPU=1024 LD_LIBRARY_PATH=/cm/shared/apps/slurm/current/lib64/slurm:/cm/shared/apps/slurm/current/lib64 LS_COLORS=rs=0

[SNIP]

 MODULESHOME=/usr/share/lmod/lmod LMOD_SETTARG_FULL_SUPPORT=no HISTSIZE=5000 LMOD_PKG=/usr/share/lmod/lmod LMOD_CMD=/usr/share/lmod/lmod/libexec/lmod SLURM_LOCALID=0 LESSOPEN=||/usr/bin/lesspipe.sh %s LMOD_FULL_SETTARG_SUPPORT=no LMOD_DIR=/usr/share/lmod/lmod/libexec BASH_FUNC_module%%=() { eval $($LMOD_CMD bash "$@") && eval $(${LMOD_SETTARG_CMD:-:} -s sh) } BASH_FUNC_ml%%=() { eval $($LMOD_DIR/ml_cmd "$@") } _=/usr/bin/env
----------------------------------
[ Back to Running Jobs ] [ Back to Top
Compiling and Running CPU Jobs
Sections:
[ Back to Top ]
General Steps: Compiling/Running Jobs
- Change to a working directory (for example the expanse101 directory):
cd /home/$USER/expanse101/MPI
- Verify that the correct modules loaded:
module list
Currently Loaded Modulefiles:
  1) slurm/expanse/20.02.3   2) cpu/1.0   3) gcc/10.2.0   4) openmpi/4.0.4
- Compile the MPI hello world code:
mpif90 -o hello_mpi hello_mpi.f90
Verify executable has been created (check that date):
ls -lt hello_mpi
-rwxr-xr-x 1 user sdsc 721912 Mar 25 14:53 hello_mpi
- Submit job
sbatch hello_mpi_slurm.sb
[ Back to Compile and Run CPU ] [ Back to Top ]
Hello World (MPI)
Subsections:
- Hello World (MPI): Source Code
- Hello World (MPI): Compiling
- Hello World (MPI): Batch Script Submission
- Hello World (MPI): Batch Script Output
- Hello World (MPI): Interactive Jobs
[ Back to Compile and Run CPU ] [ Back to Top ]
Hello World (MPI): Source Code
- Change to the tutorial
MPIexamples directory: - Source code with basic MPI elements:
[username@login01 MPI]$ cat hello_mpi.f90
!  Fortran example
   program hello
   include 'mpif.h'
   integer rank, size, ierror, tag, status(MPI_STATUS_SIZE)

   call MPI_INIT(ierror)
   call MPI_COMM_SIZE(MPI_COMM_WORLD, size, ierror)
   call MPI_COMM_RANK(MPI_COMM_WORLD, rank, ierror)
   print*, 'node', rank, ': Hello world!'
   call MPI_FINALIZE(ierror)
   end
[username@login01 MPI]$
[ Back to Hello World MPI ] [ Back to Compile and Run CPU ] [ Back to Top ]
Hello World (MPI): Compiling
- To compile, checkout the instructions in the README.txt file.
- Follow the instructions in the batch script provided for the compiler you want to test.
[username@login01 MPI]$ cat README.txt
[1] Compile:
# Load module environment
module purge
module load slurm
module load cpu
module load gcc/10.2.0
module load openmpi/4.0.4
mpif90 -o hello_mpi hello_mpi.f90

[2a] Run using Slurm:
sbatch hellompi-slurm.sb

[2b] Run using Interactive CPU Node
srun --partition=debug  --pty --account=abc123 --nodes=1 --ntasks-per-node=128 --mem=248G -t 00:30:00 --wait=0 --export=ALL /bin/bash
- Follow the compile instructions for the compiler that you want to use
[username@login01 MPI]$ module purge
[username@login01 MPI]$ module load slurm
[username@login01 MPI]$ module load cpu
[username@login01 MPI]$ module load gcc/10.2.0
[username@login01 MPI]$ module load openmpi/4.0.4
[username@login01 MPI]$ module load openmpi/4.0.4
[username@login01 MPI]$ module list

Currently Loaded Modules:
  1) slurm/expanse/20.02.3   2) cpu/1.0   3) gcc/10.2.0   4) openmpi/4.0.4
- Next, compile the code:
[username@login01 MPI]$
mpif90 -o hello_mpi hello_mpi.f90
[username@login01 MPI]$ mpif90 -o hello_mpi hello_mpi.f90
[username@login01 MPI]$ ll
total 125
drwxr-xr-x 2 username abc123 12 Dec 10 00:58 .
drwxr-xr-x 8 username abc123 8 Oct 8 04:16 ..
-rwxr-xr-x 1 username abc123 21576 Oct 7 11:28 hello_mpi
[snip]
[ Back to Hello World MPI ] [ Back to Compile and Run CPU ] [ Back to Top ]
Hello World (MPI): Batch Script Submission
- There are several batch scripts provided that contain the module commands needed to compile and run the code. The contents of the default batch script are:
[username@login01 MPI]$ cat hellompi-slurm.sb
#!/bin/bash
#SBATCH --job-name="hellompi"
#SBATCH --output="hellompi.%j.%N.out"
#SBATCH --partition=compute
#SBATCH --nodes=2
#SBATCH --ntasks-per-node=128
#SBATCH --export=ALL
#SBATCH -t 00:10:00

#This job runs with 2 nodes, 128 cores per node for a total of 256 cores.
## Environment
module purge
module load slurm
module load cpu
module load gcc/10.2.0
module load openmpi/4.0.4

## Use srun to run the job

srun --mpi=pmi2 -n 256 --cpu-bind=rank ./hello_mpi
- In this batch script we are using the GNU compiler, and asking for 2 CPU compute nodes, with 128 tasks per node for a total of 256 tasks.
-
the name of job is set in line 2, while the name of the output file is set in line 3, where "%j" is the SLURM JOB_ID, and and "%N" is the compute node name. You can name your outupt file however you wish, but it helpful to keep track of the JOB_ID and node info in case something goes wrong.
- Submit the batch script Submission using the sbatch commmand and monitor the job status using the squeue command:
JOBID PARTITION     NAME     USER ST       TIME  NODES NODELIST(REASON)
667424   compute hellompi  username PD       0:00      2 (Priority)
[username@login01 MPI]$ squeue -u username -u username
JOBID PARTITION     NAME     USER ST       TIME  NODES NODELIST(REASON)
667424   compute hellompi  username PD       0:00      2 (Priority)
[username@login01 MPI]$ squeue -u username -u username
^[[A             JOBID PARTITION     NAME     USER ST       TIME  NODES NODELIST(REASON)
667424   compute hellompi  username CF       0:01      2 exp-2-[28-29]
[username@login01 MPI]$ squeue -u username -u username
JOBID PARTITION     NAME     USER ST       TIME  NODES NODELIST(REASON)
667424   compute hellompi  username  R       0:02      2 exp-2-[28-29]
[username@login01 MPI]$ squeue -u username -u username
             JOBID PARTITION     NAME     USER ST       TIME  NODES NODELIST(REASON)
[username@login01 MPI]$ ll
total 151
drwxr-xr-x 2 username abc123    13 Dec 10 01:06 .
drwxr-xr-x 8 username abc123     8 Oct  8 04:16 ..
-rwxr-xr-x 1 username abc123 21576 Oct  8 03:12 hello_mpi
-rw-r--r-- 1 username abc123  8448 Oct  8 03:32 hellompi.667424.exp-2-28.out
[username@login01 MPI]$
[username@login01 MPI]$
[username@login01 MPI]$ cat hellompi.667424.exp-2-28.out
 node           1 : Hello world!
 node           0 : Hello world!
 [snip]
 node         247 : Hello world!
 node         254 : Hello world!
 node         188 : Hello world!
 node         246 : Hello world!
[ Back to Hello World MPI ] [ Back to Compile and Run CPU ] [ Back to Top ]
Hello World (MPI): Batch Script Output
Batch Script Output
[ Back to Hello World MPI ] [ Back to Compile and Run CPU ] [ Back to Top ]
Hello World (MPI): Interactive Jobs
Interactive Jobs
[ Back to Hello World MPI ] [ Back to Compile and Run CPU ] [ Back to Top ]
Hello World (OpenMP)
Subsections:
- Hello World (OpenMP): Source Code
- Hello World (OpenMP): Compiling
- Hello World (OpenMP): Batch Script Submission
- Hello World (OpenMP): Batch Script Output
[ Back to Hello World OpenMP ] [ Back to Compile and Run CPU ] [ Back to Top ]
Hello World (OpenMP): Source Code
Source Code.
hello-world-omp source code
[ Back to Hello World OpenMP ] [ Back to Compile and Run CPU ] [ Back to Top ]
Hello World (OpenMP): Compiling
Compiling.
[ Back to Hello World OpenMP ] [ Back to Compile and Run CPU ] [ Back to Top ]
Hello World (OpenMP): Batch Script Submission
Batch Script Submission
[ Back to Hello World OpenMP ] [ Back to Compile and Run CPU ] [ Back to Top ]
Hello World (OpenMP): Batch Script Output
Batch Script Output
[ Back to Hello World OpenMP ] [ Back to Compile and Run CPU ] [ Back to Top ]
Compiling and Running Hybrid (MPI + OpenMP) Jobs
Subsections:
- Hybrid (MPI + OpenMP): Source Code
- Hybrid (MPI + OpenMP): Compiling
- Hybrid (MPI + OpenMP): Batch Script Submission
- Hybrid (MPI + OpenMP): Batch Script Output
[Back to Hybrid (MPI+OpenMP) ] [ Back to Compile and Run CPU ] [ Back to Top ]
Hello World Hybrid (MPI + OpenMP): Source Code
Source Code.
aaaaa
[Back to Hybrid (MPI+OpenMP) ] [ Back to Compile and Run CPU ] [ Back to Top ]
Hello World Hybrid (MPI + OpenMP): Compiling
Compiling.
[Back to Hybrid (MPI+OpenMP) ] [ Back to Compile and Run CPU ] [ Back to Top ]
Hello World Hybrid (MPI + OpenMP): Batch Script Submission
Batch Script Submission
[ Back to Hybrid (MPI+OpenMP) ] [ Back to Compile and Run CPU ] [ Back to Top ]
Hello World Hybrid (MPI + OpenMP): Batch Script Output
Batch Script Output
[Back to Hybrid (MPI+OpenMP) ] [ Back to Compile and Run CPU ] [ Back to Top ]
Compiling and Running GPU Jobs
Sections
Using Expanse GPU Nodes
Using Expanse GPU Nodes
Expanse GPU Hardware
| GPU Type | NVIDIA V100 SMX2 |
|---|---|
| Nodes | 52 |
| GPUs/node | 4 |
| CPU Type | Xeon Gold 6248 |
| Cores/socket | 20 |
| Sockets | 2 |
| Clock speed | 2.5 GHz |
| Flop speed | 34.4 TFlop/s |
| Memory capacity | *384 GB DDR4 DRAM |
| Local Storage | 1.6TB Samsung PM1745b NVMe PCIe SSD |
| Max CPU Memory bandwidth | 281.6 GB/s |
Using GPU Nodes
- GPU nodes are allocated as a separate resource. The conversion rate is (TBD) Expanse Service Units (SUs) to 1 V100 GPU-hour.
- Login nodes are not the same as the GPU nodes:
- GPU codes must be compiled by requesting an interactive session on a GPU nodes
- Batch: GPU nodes can be accessed via either the "gpu" or the "gpu-shared" partitions.
- #SBATCH -p gpu
- or #SBATCH -p gpu-shared
- Be sure to setup your CUDA environment:
#Environment
module purge
module load slurm
module load gpu
module load pgi
- Interactive GPU node:
srun --pty --nodes=1 --account=abc123 --ntasks-per-node=1 --cpus-per-task=10 -p gpu-debug --gpus=1 -t 00:10:00 /bin/bash
[ Back to Compile and Run GPU Jobs ] [ Back to Top ]
Using Interactive GPU Nodes
- Change to the tutorial
OpenACCdirectory
[username@exp-7-59 OpenACC]$ ll
total 71
-rw-r--r-- 1 username abc123  2136 Oct  7 11:28 laplace2d.c
-rwxr-xr-x 1 username abc123 52056 Oct  7 11:28 laplace2d.openacc.exe
-rw-r--r-- 1 username abc123   234 Oct  7 11:28 OpenACC.108739.exp-7-57.out
-rw-r--r-- 1 username abc123   307 Oct  8 00:21 openacc-gpu-shared.sb
-rw-r--r-- 1 username abc123  1634 Oct  7 11:28 README.txt
-rw-r--r-- 1 username abc123  1572 Oct  7 11:28 timer.h
- Obtain an interactive node:
[username@login01 OpenACC]$ srun --pty --nodes=1 --ntasks-per-node=1 --cpus-per-task=10 -p gpu-debug --gpus=1 -t 00:10:00 /bin/bash
[ Back to Compile and Run GPU Jobs ] [ Back to Top ]
Obtaining GPU/CUDA: Node Information
- Once you are on an interactive node, you can check node configuration using the nvidia-smi command:
[username@exp-7-59 OpenACC]$ nvidia-smi
Thu Oct  8 03:58:44 2020
+-----------------------------------------------------------------------------+
| NVIDIA-SMI 450.51.05    Driver Version: 450.51.05    CUDA Version: 11.0     |
|-------------------------------+----------------------+----------------------+
| GPU  Name        Persistence-M| Bus-Id        Disp.A | Volatile Uncorr. ECC |
| Fan  Temp  Perf  Pwr:Usage/Cap|         Memory-Usage | GPU-Util  Compute M. |
|                               |                      |               MIG M. |
|===============================+======================+======================|
|   0  Tesla V100-SXM2...  On   | 00000000:18:00.0 Off |                    0 |
| N/A   32C    P0    41W / 300W |      0MiB / 32510MiB |      0%      Default |
|                               |                      |                  N/A |
+-------------------------------+----------------------+----------------------+

+-----------------------------------------------------------------------------+
| Processes:                                                                  |
|  GPU   GI   CI        PID   Type   Process name                  GPU Memory |
|        ID   ID                                                   Usage      |
|=============================================================================|
|  No running processes found                                                 |
+-----------------------------------------------------------------------------+
[username@exp-7-59 OpenACC]$
[ Back to Compile and Run GPU Jobs ] [ Back to Top ]
GPU: Must Compile on Interactive node
[username@login01 OpenACC]$
cat README.txt
[1] Compile Code:
(a) Get an interactive GPU debug node:
module load slurm
srun --pty --nodes=1 --ntasks-per-node=1 --cpus-per-task=10 -p gpu-debug --gpus=1 -t 00:10:00 /bin/bash

(b) On the GPU node:
module purge
module load slurm
module load gpu
module load pgi
pgcc -o laplace2d.openacc.exe -fast -Minfo -acc -ta=tesla:cc70 laplace2d.c

Compiler output:
GetTimer:
     20, include "timer.h"
          61, FMA (fused multiply-add) instruction(s) generated
laplace:
     47, Loop not fused: function call before adjacent loop
         Loop unrolled 8 times
         FMA (fused multiply-add) instruction(s) generated
     55, StartTimer inlined, size=2 (inline) file laplace2d.c (37)

[SNIP]
          75, #pragma acc loop gang, vector(4) /* blockIdx.y threadIdx.y */
         77, #pragma acc loop gang, vector(32) /* blockIdx.x threadIdx.x */
     88, GetTimer inlined, size=9 (inline) file laplace2d.c (54)
Exit out of debug node after this)

[2] Run job:
sbatch openacc-gpu-shared.sb
[ Back to Compile and Run GPU Jobs ] [ Back to Top ]
Hello World (GPU)
Subsections:
- Hello World (GPU): Source Code
- Hello World (GPU): Compiling
- Hello World (GPU): Batch Script Submission
- Hello World (GPU): Batch Script Output
Hello World (GPU): Source Code
Source Code
[username@login01 OpenACC]$ !cat
cat laplace2d.c
/*
 *  Copyright 2012 NVIDIA Corporation
 *
 *  Licensed under the Apache License, Version 2.0 (the "License");
 *  you may not use this file except in compliance with the License.
 *  You may obtain a copy of the License at
 *
 *      http://www.apache.org/licenses/LICENSE-2.0
 *
 *  Unless required by applicable law or agreed to in writing, software
 *  distributed under the License is distributed on an "AS IS" BASIS,
 *  WITHOUT WARRANTIES OR CONDITIONS OF ANY KIND, either express or implied.
 *  See the License for the specific language governing permissions and
 *  limitations under the License.
 */

#include <math.h>
#include <string.h>
#include <stdio.h>
#include "timer.h"

#define NN 4096
#define NM 4096

double A[NN][NM];
double Anew[NN][NM];

int main(void)
{
	int laplace(void);
	printf("main()\n");
	laplace();
}

int laplace()
{
    const int n = NN;
    const int m = NM;
    const int iter_max = 1000;

    const double tol = 1.0e-6;
    double error     = 1.0;

    memset(A, 0, n * m * sizeof(double));
    memset(Anew, 0, n * m * sizeof(double));

    for (int j = 0; j < n; j++)
    {
        A[j][0]    = 1.0;
        Anew[j][0] = 1.0;
    }
    printf("Jacobi relaxation Calculation: %d x %d mesh\n", n, m);
    StartTimer();
    int iter = 0;

#pragma acc data copy(A), create(Anew)
    while ( error > tol && iter < iter_max )
    {
        error = 0.0;

#pragma acc kernels
        for( int j = 1; j < n-1; j++)
        {
            for( int i = 1; i < m-1; i++ )
            {
                Anew[j][i] = 0.25 * ( A[j][i+1] + A[j][i-1]
                                    + A[j-1][i] + A[j+1][i]);
                error = fmax( error, fabs(Anew[j][i] - A[j][i]));
            }
        }

#pragma acc kernels
        for( int j = 1; j < n-1; j++)
        {
            for( int i = 1; i < m-1; i++ )
            {
                A[j][i] = Anew[j][i];
            }
        }

        if(iter % 100 == 0) printf("%5d, %0.6f\n", iter, error);

        iter++;
    }
    double runtime = GetTimer();
    printf(" total: %f s\n", runtime / 1000);
}
[ Back to Hello World (GPU)] [ Back to Compile and Run GPU Jobs ] [ Back to Top ]
Hello World (GPU): Compiling
Compile the code:
- obtain an interactive node
- load the right Modules
- compile the Source code
- exit interactive node
[username@login01 ~]$ module load slurm
[username@login01 ~]$ srun --pty --nodes=1 --ntasks-per-node=1 --cpus-per-task=10 -p gpu-debug -A abc123 --gpus=1 -t 00:10:00 /bin/bash
srun: job 667263 queued and waiting for resources
srun: job 667263 has been allocated resources
[username@exp-7-59 ~]$ module purge
[username@exp-7-59 ~]$ module load slurm
[username@exp-7-59 ~]$ module load gpu
[username@exp-7-59 ~]$ module load pgi
[username@exp-7-59 ~]$ module list

Currently Loaded Modules:
  1) slurm/expanse/20.02.3   2) gpu/1.0   3) pgi/20.4

  [username@exp-7-59 OpenACC]$ pgcc -o laplace2d.openacc.exe -fast -Minfo -acc -ta=tesla:cc70 laplace2d.c
  "laplace2d.c", line 91: warning: missing return statement at end of non-void
            function "laplace"
    }
    ^

  GetTimer:
       20, include "timer.h"
            61, FMA (fused multiply-add) instruction(s) generated
[SNIP]
[username@exp-7-59 OpenACC]$ exit
exit
[username@login01 ~]$
[ Back to Hello World (GPU) ] [ Back to Compile and Run GPU Jobs ] [ Back to Top ]
Hello World (GPU): Batch Script Submission
- Batch Script Contents
[username@login01 OpenACC]$ cat openacc-gpu-shared.sb
#!/bin/bash
#SBATCH --job-name="OpenACC"
#SBATCH --output="OpenACC.%j.%N.out"
#SBATCH --partition=gpu-shared
#SBATCH --nodes=1
#SBATCH --ntasks-per-node=1
#SBATCH --gpus=1
#SBATCH -t 01:00:00

#Environment
module purge
module load slurm
module load gpu
module load pgi

#Run the job
./laplace2d.openacc.exe
- Submit the batch script, and monitor queue status:
- PD == Pending
- ST == Starting
- R == Running
[username@login01 OpenACC]$ !sb
sbatch openacc-gpu-shared.sb
Submitted batch job 667276
[username@login01 OpenACC]$ !sq
squeue -u username -u username
             JOBID PARTITION     NAME     USER ST       TIME  NODES NODELIST(REASON)
            667276 gpu-share  OpenACC  username PD       0:00      1 (Priority)
[username@login01 OpenACC]$
[username@login01 OpenACC]$ squeue -u username -u username
             JOBID PARTITION     NAME     USER R       TIME  NODES NODELIST(REASON)
             [username@login01 OpenACC]$ cat OpenACC.667276.exp-1-60.out
             main()
             Jacobi relaxation Calculation: 4096 x 4096 mesh
                 0, 0.250000
               100, 0.002397
               200, 0.001204
               300, 0.000804
               400, 0.000603
               500, 0.000483
               600, 0.000403
               700, 0.000345
               800, 0.000302
               900, 0.000269
              total: 1.044246 s
             [username@login01 OpenACC]$
[ Back to Hello World (GPU) ] [ Back to Compile and Run GPU Jobs ] [ Back to Top ]
Hello World (GPU): Batch Script Output
- Batch Script Output:
dddd
[ Back to Hello World (GPU) ] [ Back to Compile and Run GPU Jobs ] [ Back to Top ]