Running Jupyter Notebook on SDSC HPC System
Jupyter Notebook Overview

Jupyter Notebooks are interactive web tools known as a computational notebooks, which researchers can use to combine software code, explanatory text and multimedia resources, and computational output, in a single document. Jupyter has emerged as a de facto standard for data scientists and other scientific domains. Notebooks can be launched locally and access local file systems, or they can be launched on a remote machine, which provides access to a user's files on the remote system. In the latter case, the notebooks are launched via a process that creates a unique URL that is composed of the hostname plus an available port (chosen by the jupyter application) plus a one-time token. The user obtains this URL and enters it into a local web browser, where the notebook is available as long as the process on the remote machine is up and running. By default, these notebooks are not secure, and potentially expose a users local files to unwanted users.
In this tutorial, we cover SDSC's multi-tiered approach to running notebooks more securely: running notebooks in the usual way using the insecure HTTP connections; hosting a Jupyter service using HTTPS and Jupyter Lab; and our new Reverse Proxy Service (RPS). When used, the RPS will launch a batch script that creates a securely hosted HTTPS access point for the user, resulting in a safer, more secure notebook environment.
By default, these notebooks are not secure, and potentially expose a user's local files to unwanted access. In this tutorial, we present SDSC's multitiered approach to running notebooks more securely.
Example Notebooks
This page will be updated regularly with example notebooks, primarily for beginners and those who are new to using notebooks on SDSC HPC Systems.
Beginner Tutorials
More Advanced
Software Prerequisites
Running Juypter notebooks relies on you handling your own python jupyter package installation. Typically, users install Anaconda on local systems. Anaconda is a common package manager used for data science, but it it not recommended for use on HPC systems and running jupyter notebooks remotely. Anaconda is a large package and has a lot of overhead. For best performance, we recommend using Miniconda.
Miniconda is a free minimal installer for conda. It is a small, bootstrap version of Anaconda that includes only conda, Python, the packages they depend on, and a small number of other useful packages.
If you're not familiar with Anaconda, check it out here.
Install Miniconda
To install Miniconda on Linux, you need to locate and download the installer package for your system. For linx, you will find a list of installers https://docs.conda.io/en/latest/miniconda.html#linux-installers. On the HPC system, use:
wget <link-to-installer-file>
to download the install package. For SDSC HPC systems, the current link is the Miniconda3 Linux 64-bit: https://repo.anaconda.com/miniconda/Miniconda3-latest-Linux-x86_64.sh
Once you have downloaded the correct installer, follow the installation instructions https://conda.io/projects/conda/en/latest/user-guide/install/index.html. For SDSC HPC systems (Expanse, Comet, TSCC, and Stratus), the name of the downloaded installer file is Miniconda3-latest-Linux-x86_64.sh
Run the installer
Change the permissions so you can execute the script:
chmod +x Miniconda3-latest-Linux-x86_64.sh
Run the bash install script:
bash Miniconda3-latest-Linux-x86_64.sh
or
./Miniconda3-latest-Linux-x86_64.sh
You should answer yes to almost all of the questions. Make sure to type in the word "yes" for the license agreement. Also be sure to type in "yes" when the installer asks you if you want to run conda init. In addition, you need to make sure that the installer has placed these two lines into your .bashrc file:
The Miniconda installer should prompt to add each of the following lines separately to the .bashrc file:

. /home/$USER/miniconda3/etc/profile.d/conda.sh
conda activate
If not present, add the two lines to the file. Once you have done this, restart your bash shell: run the command
source ~/.bashrc
which "restarts" the shell environment.
Miniconda should now be installed. By default, Miniconda should be installed in your home directory:
Miniconda3 will now be installed into this location:
/home/$USER/miniconda3
If Miniconda still does not seem to be installed, try using the command source ~/.bashrc, which "restarts" conda.
To verify the installation, run the command:
(base) [mthomas@comet-ln2:~] which conda
~/miniconda3/bin/conda
Install Jupyter Notebook
To run jupyter notebooks, you need to install the jupyter package using the command
conda install jupyter
To verify the installation, run the command:
(base) [$USER@comet-ln2:~] which jupyter
~/miniconda3/bin/jupyter
More installation information can be found here: https://anaconda.org/anaconda/jupyter.
Install JupyterLab
JupyterLab is designed as an extensible environment and can be installed with conda, pip, docker, etc. For full details, see: https://jupyterlab.readthedocs.io/en/stable/getting_started/installation.html
To use conda to install jupyerlab, run the terminal command:
conda install -c conda-forge jupyterlab
To verify the installation, run the command:
(base) [$USER@comet-ln2:~] which jupyter-labextension
~/miniconda3/bin/jupyter-labextension
Other Python Packages**
Any other Python packages you need to run your notebook should be installed with Conda. You can install python packages in a conda environment while your notebook is running. This is useful if you forgot a package, you won't have to worry about cancelling and restarting your job before installing. However, it is recommended that you install all required packages beforehand to save yourself valuable compute time.
Setup a Conda Virtual Environment
Choose whatever name you want - it should reflect the application/project you are working on. $ conda create --name example_env
To see which virtual environments you've created
$ conda env list
To use a particular virtual environment (e.g., one named ‘example_env'): $ source activate example_env # Note: don't use ‘conda activate'
To see which versions of a package are available
(example_env) $ conda search package_name This searches for packages from the default "channel." Other channels might have newer versions available. For instance, we've seen more recent versions of the ‘yt' package in the channel named "conda-forge". To install from a different channel, use something like: (example_env) $ conda search -c conda-forge yt
To install packages in an active virtual environment
(example_env) $ conda install package_name # e.g, like ‘yt' As with the package search, you can install from a different channel using a ‘-c channel_name' flag, e.g.: (example_env) $ conda install -c conda-forge yt
To update a package to a newer version
(example_env) $ conda update package_name Like install and search, this command can take a ‘-c channel-name' flag if you want to update to newer versions than are in the default channel.
To start a Python interpreter with access to the installed packages:
(example_env) $ python # python3 works as well
To stop using the current virtual environment:
(example_env) $ source deactivate
To delete an inactive virtual environment:
$ conda env remove --name example_env
Other Python Packages
Any other Python packages you need to run your notebook should be installed with Conda. You can install python packages in a conda environment while your notebook is running. This is useful if you forgot a package, you won't have to worry about cancelling and restarting your job before installing. However, it is recommended that you install all required packages beforehand to save yourself valuable compute time.
Download Example Notebooks
For these examples, you should have some simple notebooks loaded into your Expanse directory for testing. You can clone the notebooks examples repository: To clone the repo, log onto comet, cd into the directory where you want to work, and type:
git clone https://github.com/sdsc-hpc-training-org/notebook-examples.git
Basic HPC Skills
If you are a beginner, or need to brush up on some basic skills needed to run jobs on HPC systems, check out our repo:
To clone the repo, log onto comet, cd into the directory where you want to work, and type:
git clone https://github.com/sdsc-hpc-training-org/basic_skills.git
Insecurity with direct node access
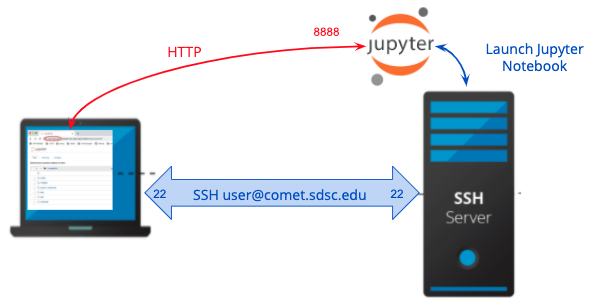
This section described how to connection between the browser on your local host (laptop) to a Jupyter service running on Comet over HTTP and demonstrates why the connection is not secure.
Log onto comet.sdsc.edu
ssh -Y -l <username> <system name>.sdsc.edu
- create a test directory, or
cdinto one you have already created - Clone the examples repository:
git clone https://github.com/sdsc-hpc-training-org/notebook-examples.git
Launch a notebook on the login node:
Run the jupyter command. Be sure to set the –ip to use the hostname, which will appear in your URL : [mthomas@comet-14-01:~] jupyter notebook --no-browser --ip='/bin/hostname'
You will see output similar to below:
[I 08:06:32.961 NotebookApp] JupyterLab extension loaded from /home/mthomas/miniconda3/lib/python3.7/site-packages/jupyterlab
[I 08:06:32.961 NotebookApp] JupyterLab application directory is /home/mthomas/miniconda3/share/jupyter/lab
[I 08:06:33.486 NotebookApp] Serving notebooks from local directory: /home/mthomas
[I 08:06:33.487 NotebookApp] The Jupyter Notebook is running at:
[I 08:06:33.487 NotebookApp] http://comet-14-01.sdsc.edu:8888/?token=6d7a48dda7cc1635d6d08f63aa1a696008fa89d8aa84ad2b
[I 08:06:33.487 NotebookApp]  or http://127.0.0.1:8888/?token=6d7a48dda7cc1635d6d08f63aa1a696008fa89d8aa84ad2b
[I 08:06:33.487 NotebookApp] Use Control-C to stop this server and shut down all kernels (twice to skip confirmation).
[C 08:06:33.494 NotebookApp]

    To access the notebook, open this file in a browser:
        file:///home/mthomas/.local/share/jupyter/runtime/nbserver-6614-open.html
    Or copy and paste one of these URLs:
        http://comet-14-01.sdsc.edu:8888/?token=6d7a48dda7cc1635d6d08f63aa1a696008fa89d8aa84ad2b
     or http://127.0.0.1:8888/?token=6d7a48dda7cc1635d6d08f63aa1a696008fa89d8aa84ad2b
[I 08:06:45.773 NotebookApp] 302 GET /?token=6d7a48dda7cc1635d6d08f63aa1a696008fa89d8aa84ad2b (76.176.117.51) 0.74ms
[E 08:06:45.925 NotebookApp] Could not open static file ''
[W 08:06:46.033 NotebookApp] 404 GET /static/components/react/react-dom.production.min.js (76.176.117.51) 7.39ms referer=http://comet-14-01.sdsc.edu:8888/tree?token=6d7a48dda7cc1635d6d08f63aa1a696008fa89d8aa84ad2b
[W 08:06:46.131 NotebookApp] 404 GET /static/components/react/react-dom.production.min.js (76.176.117.51) 1.02ms referer=http://comet-14-01.sdsc.edu:8888/tree?token=6d7a48dda7cc1635d6d08f63aa1a696008fa89d8aa84ad2b
Notice that the notebook URL is using HTTP, and when you connect the browser on your local sysetm to this URL, the connection will not be secure. Note: it is against SDSC Comet policy to run applications on the login nodes, and any applications being run will be killed by the system admins. A better way is to run the jobs on an interactive node or on a compute node using the batch queue (see the Comet User Guide), or on a compute node, which is described in the next sections.
Obtain an interactive node:
Jobs can be run on the cluster in batch mode or in interactive mode. Batch jobs are performed remotely and without manual intervention. Interactive mode enable you to run/compile your program and environment setup on a compute node dedicated to you. To obtain an interactive node, type: srun --pty --nodes=1 --ntasks-per-node=24 -p compute -t 02:00:00 --wait 0 /bin/bash You will have to wait for your node to be allocated - which can take a few or many minutes. You will see pending messages like the ones below:
srun: job 24000544 queued and waiting for resources
srun: job 24000544 has been allocated resources
[mthomas@comet-18-29:~/hpctrain/python/PythonSeries]
You can also check the status of jobs in the queue system to get an idea of how long you may need to wait.
Launch the Jupyter Notebook application. Note: this application will be running on a compute node, and you must keep track of the given URL:
jupyter notebook --no-browser --ip='/bin/hostname'
This will give you an address which has localhost in it and a token. Something like: http://comet-14-0-4:8888/?token=xxxxxxxxxxxxxxxxxxxxxxxxxxxxxxxxxxxxxxxxxx You can then paste it into your browser. You will see a running Jupyter notebook and a listing of the notebooks in your directory. From there everything should be working as a regular notebook. Note: This token is your auth so don't email/send it around. It will go away when you stop the notebook.
To learn about Python, run the Python basics.ipynb notebook. To see an example of remote visualization, run the Matplotlib.ipynb notebook!
Access the node in your browser
Copy the the URL above into the browser running on your laptop.
Use your jupyterlab/jupyter notebook server!
Enjoy. Note that your notebook is unsecured.
Security with SSH Tunneling
Connection to Notebook over SSH tunneling (secure)
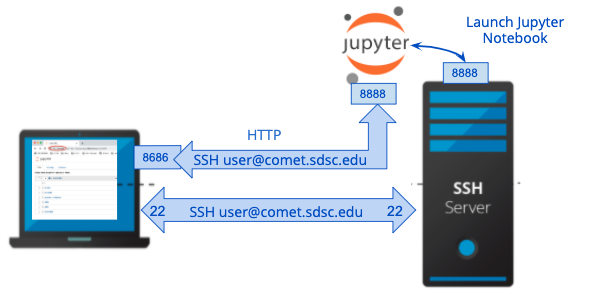
This section shows you how to launch a Jupyter Notebook using an interactive node or on a compute node, and to use ssh tunneling to securely connect to the notebook server.
Interactive Node Method
Open two terminals on your computer
We will use one terminal to start the notebook, and the other to establish the tunnel. Pick the first terminal, call it T1.
SSH into comet from your local computer:
In T1, ssh user@comet.sdsc.edu. This is just a regular SSH login.
Claim an interactive node
In T1, srun --partition=debug --pty --nodes=1 --ntasks-per-node=24 -t 00:30:00 --wait=0 --export=ALL /bin/bash
Feel free to adjust the parameters, but remember that in the debug partition you can only claim a node for up to 30 minutes. You can use other queues, but you may have to wait longer. Take note of the <node name> of the interactive node.
Start a jupyter notebook server on the interactive node.
In T1, run the command jupyter notebook --no-browser
The no browser option is required, otherwise the program may think you want a text representation of your outputs in the terminal, which trust me - you don't want. You can also specify a port number if you wish using the --port 1234 option. Note the value of the <jupyter port> number returned by the command.
Create SSH Tunnel Connection
In the next command, you will create an ssh connection between your local host and the notebook port on the remote, interactive node. When you connect your browser to the notebook service, this will channel all communications via the SSH connection, which is secure and encrypted. In the second terminal, call it T2, run the command
ssh -L 8888:127.0.0.1:<jupyter port> user@comet-14-01.sdsc.edu Replace comet-14-01 with the name of the compute node. You can view the compute node in T1 prompt. Replace the <jupyter port> with the port the jupyter notebook started on after running the jupyter notebook --no-browser command in window T1. The default jupyter port number is 8888, but don't worry if its different. This establishes a tunnel between port 8888 on your computer and the jupyter port on the compute node
Visit the port in your local browser
In any browser, type in 127.0.0.1:8888 and you should get your notebook. You'll have to input the jupyter token available in your terminal.
If for some reason that address doesn't work, check the output of the terminal. You could try using the address localhost:8888 or 0.0.0.0:8888. The reason tunneling is generally not the prefered method is because it is complicated and the port numbers sometimes are not available by the time you access the service. And, you can't know the port the jupyter notebook is going end up open on until you start it on the node, and you need to tunnel through that port… which is why we need two terminals in this example.
Compute Node Method
In this example, we use a batch script to obtain a compute node, and to launch a jupyter lab or notebook. You can access the jupyter service directly from your browser once it has started running on the comet node. This method uses the SSH Tunneling method described above to make a secure SSH connection between your laptop and the Jupyter services.
First, log onto comet using SSH.
Copy the batch script example
#!/usr/bin/env bash
#SBATCH --job-name=tensorflow-compute
#SBATCH --partition=compute
#SBATCH --time=00:30:00
#SBATCH --nodes=1
#SBATCH --ntasks-per-node=24
#SBATCH --output=tensorflow-compute.o%j.%N
module purge
module list
printenv
time -p singularity exec /share/apps/compute/singularity/images/tensorflow/tensorflow-cpu.simg jupyter lab --no-browser --ip="$(hostname)"
This example uses the tensorflow singularity container available on comet. You can use any container you want. If you check out /share/apps/computer/singularity you can find many useful containers. The key part of this example is how the jupyter lab is started at the end - jupyter lab --no-browser --ip "${hostname}".
Submit this script to the queue
Simply run sbatch run-jupyter-tensorflow-compute.sh One thing you may want to do is change the script to be --partition=debug if you want a shorter wait time.
Access the node in your browser
First, wait for the job to be submitted to the queue. Then, monitor the output file created by your batch job, which looks something like tensorflow-compute.o%j.%N if you used the example. Inside this file, you will see the output of the jupyterlab command. There, you should be able to see the port the jupyterlab server is running on, as well as the token you will need to login. My recommendation would be to just memorize the port number and copy the jupyter token. The port is almost always 8888 so it shouldn't be that hard to remember. You will also need to know the comet node you are logged in on. You can view this by typing this command: squeue -u $USER. Under the NODELIST section you can see the comet node.
Open up a new tab in your browser, and type in the following: http://comet-xx-xx.sdsc.edu:PPPP where comet-xx-xx is the comet node, PPPP is the port number (usually 8888). The jupyter notebook page should show up, and you can now paste in the token from the output file.
Use your jupyterlab/jupyter notebook server!
Enjoy. Note that your notebook connection is secured and encrypted.
Security with Reverse Proxy Service
- Connection to Notebook over HTTPS using the Reverse Proxy Service (very secure)
Overview

The SDSC Reverse Proxy Service is a prototype system that will allow users to launch standard Jupyter Services on on any Comet compute node using a reverse proxy server using a simple bash script called start-jupyter. The notebooks will be hosted on the internal cluster network as an HTTP service using standard jupyter commands. The service will then be made available to the user outside of the cluster firewall as an HTTPS connection between the external users web browser and the reverse proxy server. The goal is to minimize software changes for our users while improving the security of user notebooks running on our HPC systems. The RPS service is capable of running on any HPC system capable of supporting the RP server (needs Apache).
Using the RPS is very simple and requires no tunneling and is secure (produces HTTPS URLs). To use RPS, SSH to connect to comet, and make sure that you have the software environment installed on the login node. Verify that you have installed the required software: Anaconda, conda, Jupyter (notebooks, lab), and other Python packages needed for you application.
Clone the RPS repository
Clone this repository directly into your comet login node.
git clone https://github.com/sdsc-hpc-training-org/reverse-proxy.git
Launching the Notebook
The start-jupyter script performs the following tasks:
- Sends a request to the reverse proxy server (RPS) to get a one-time token and a port number
- Launches the jupyter notebook command using the token and port number.
- Prints a secure URL containing the token to the terminal, so that the user can copy/paste the URL into a local browser:
Your notebook is here:
    https://aversion-runaround-spearman.comet-user-content.sdsc.edu?token=099aa825b1403d58889842ab2c758885
Usage
./start-jupyter [-p <string>] [-d <string>] [-A <string>] [-b <string>] [-t time] [-i]
-p: the partition to wait for. debug or compute
    Default Partition is "compute"

-d: the top-level directory of your jupyter notebook
    Default Dir is /home/$USER

-A: the project allocation to be used for this notebook
    Default Allocation is your sbatch system default allocation (also called project or group)

-b: the batch script you want to submit with your notebook. Only those in the `batch` folder are supported.
    Default batch script is ./batch/batch_notebook.sh

-t: the time to run the notebook. Your account will be charged for the time you put here so be careful.
    Default time is 30 minutes

-i: Get extra information about the job you submitted using the script
(If you don't know what $USER is, try this command: echo $USER. This is just your comet username)
Note that the time positional argument must occur after all the flags. There will be an error if you put any flags after the positional argument.
NOTE: Using the script on multiple systems
There are minor differences when using the script on Comet vs. Stratus vs. TSCC. TSCC uses a queue system called Torque, whereas Comet and Stratus use Slurm. You will see example notebook and jupyterlab scripts for Torque and Slurm in the RPS repository. The most important thing to notice is that when you run start-jupyter it will automatially run with defaults for the cluster you are using. So you don't need to worry as much about which cluster you're on.
Example Commands
Start a notebook with all defaults on any system ./start-jupyter
Start a jupyterlab session with rest defaults on Comet ./start-jupyter -b slurm/jupyterlab.sh
Start a jupyterlab session with rest defaults on TSCC ./start-jupyter -b torque/jupyterlab.sh
Start a notebook in the debug queue on Comet only ./start-jupyter -d ~ -p debug -t 30
Start a notebook in the compute queue on Comet only ./start-jupyter -d ~ -A ddp363 -p compute -t 60
Example Output
This is your waiting screen. This screen occurs before your batch job is submitted. 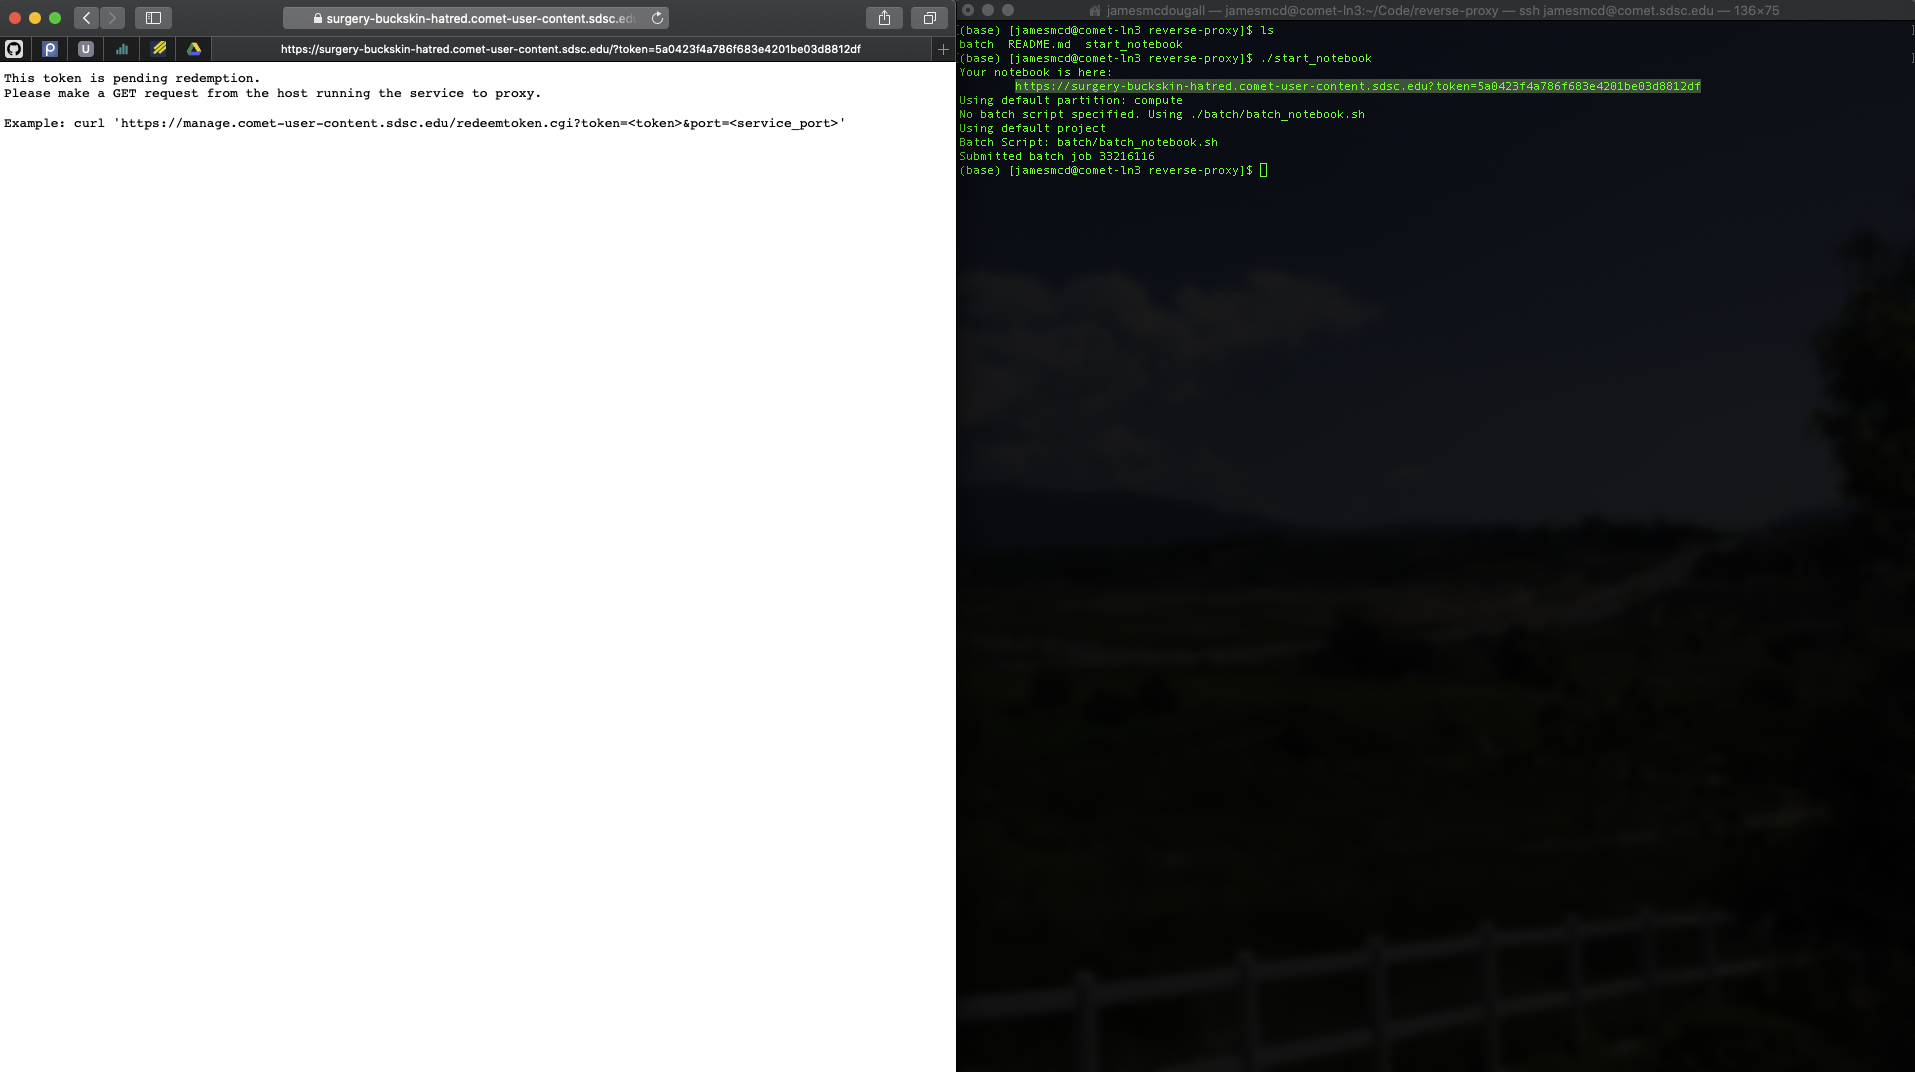
Your notebook is ready to go! 
If you refresh too soon, you may see this page. This is expected and you'll just have to wait. 
About the Team
Mary Thomas is a principal leader of the SDSC HPC Training team.
James McDougall is the student intern who worked on the Reverse Proxy Service and documentation. Check out his github. Email him if you have questions about using the reverse proxy service or have questions about Jupyter notebooks.
Scott Sakai is the security expert and ops/backend for the Reverse Proxy Service.
Marty Kandes specializes in Singularity containers including Jupyter Notebook containers.
Bob Sinkovits wrote the Python basic skills notebooks.
Contact Us
If you have questions or trouble with the material in this tutorial, see the Comet User Guide, or please contact the following consulting teams:
XSEDE Help: help@xsede.org </tr> Non-XSEDE Help: consult@sdsc.edu </tr> </table> </blockquote>